2010-07-31

Online ေပၚမွအခမဲ့ Data Recovery Software မ်ား

သင့္ Hard Disk Partition ထဲမွ အေရးႀကီးတဲ့ Data ေတြ မေတာ္တဆ Delete လုပ္မိရင္ပဲျဖစ္ျဖစ္၊ Partition မွားယြင္းၿပီး Format ခ်မိရင္ပဲျဖစ္ျဖစ္၊ file ေတြကို recovery software မ်ားအသုံးျပဳၿပီး ျပန္လည္ရွာေဖြေပးႏုိင္မွာ ျဖစ္ပါတယ္။ ဒီလုိ ရွာေဖြမယ္ဆုိရင္ Hard disk ကုိ လက္ရွိ အသုံးျပဳေနတဲ့ေနရာမွာ ထပ္ၿပီး data ေတြ save မလုပ္ ဖုိ႔ေတာ့ လုိအပ္ပါလိမ့္မယ္။ ဒါမွသာ file ေတြကို မပ်က္မဆီး မဆုံး႐ႈံးပဲ ျပန္လည္ရရွိႏုိင္မွာ ျဖစ္ပါတယ္။ recovery software ေတြဟာ internet ေပၚမွာ အမ်ားအျပားရွိေပမယ့္ အခမဲ့အသုံးျပဳႏုိင္မယ့္ Top Ten Free Recovery Software ေတြကုိ ေဖာ္ျပေပးလုိက္ပါတယ္။


TOKIWA DataRecovery
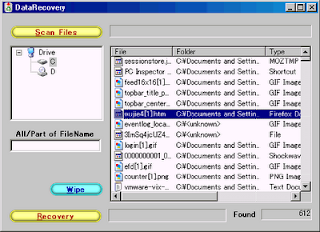
TOKIWA DataRecovery Software ကုိ အလြယ္တကူနဲ႔ ျမန္ျမန္ဆန္ဆန္ အသုံးျပဳႏုိင္တာေၾကာင့္ လူႀကိဳက္ မ်ားပါတယ္။ ထုိ႔ျပင္ ဆုံး႐ႈံးသြားတဲ့ file ေတြကို ျပန္လည္ရွာေဖြေပးရာမွာလည္း file ေတြကို အမ်ားဆုံး ျပန္ရွာ ေပးႏုိင္ၿပီး Data Lost ျဖစ္မႈနည္းေအာင္ ျပဳလုပ္ေပးႏုိင္တဲ့ Recovery Software တစ္ခုျဖစ္ပါတယ္။


RECUVA


C Cleaner မွ ထုတ္လုပ္တဲ့ Recovery Software ျဖစ္ပါတယ္။ အခမဲ့ ရရွိတဲ့ Recovery Software ေတြထဲမွာ လူသုံးမ်ားတဲ့ Software တစ္ခုျဖစ္ပါတယ္။ Install ျပဳလုပ္ရာမွာ လြယ္ကူၿပီး USB ႏွင့္ Memory Card ထဲမွ file ေတြကုိ Recuva ရဲ႕ Latest Version မွာ ရရွိႏုိင္မွာျဖစ္ၿပီး၊ Data ေတြကုိ အလြယ္တကူနဲ႔ Restore ျပန္လုပ္ေပး ႏုိင္မွာ ျဖစ္ပါတယ္။


SOFTPERFECT FILE RECOVERY


Delete လုပ္မိတဲ့ Data ကုိ Undelete ျပန္လုပ္ဖုိ႔အတြက္ကေတာ့ Soft Perfect file software က စြမ္းေဆာင္ ႏုိင္မွာျဖစ္ပါတယ္။ Hard Disk ေပၚမွာဆုိရင္ FAT 12 ကေန NTFS Partition ေတြအထိ အသုံးျပဳႏုိင္မွာျဖစ္ၿပီး USB ႏွင့္ Memory Card ေတြက file ေတြကုိလည္း Recovery လုပ္ႏုိင္မွာ ျဖစ္ပါတယ္။


PC INSPECTOR FILE RECOVERY


PC Inspector File Recovery ဟာ FAT နဲ႔ NTFS Format ေပၚမွာရွိတဲ့ file ေတြကို ျပန္လည္ Restore လုပ္ႏုိင္႐ုံသာမက Partition ကုိ Format ခ်မိတဲ့အခါမွာလည္း Data ေတြကို ျပန္ရွာေဖြေပးႏုိင္မယ့္ အသုံး၀င္တဲ့ Recovery Software တစ္ခုျဖစ္ပါတယ္။


GLARY UNDELETE


FAT 12, 32 နဲ႔ NTFS Format ေတြေပၚမွာ မူရင္း file မ်ားကို ပ်က္ဆီးမႈအနည္းဆုံးနဲ႔ ျပန္လည္ရွာေဖြ ေပးႏုိင္မည့္ Recovery Software ျဖစ္ပါတယ္။ Windows 95 မွာ Windows 7 အထိ မည္သည့္ OS တြင္မဆုိ အသုံးျပဳႏုိင္မွာ ျဖစ္ပါတယ္။ Hard Disk ေတြမွာသာမက Memory Card နဲ႔ USB Stick ေတြေပၚမွာပါ အသုံးျပဳ ႏုိင္မွာျဖစ္ပါတယ္။


FREE UNDELETE


Free Undelete ဟာ file ေတြကို မွားယြင္းဖ်က္မိတဲ့အခါ ျပန္လည္ရွာေဖြေပးႏုိင္တဲ့ Recovery Software တစ္ခုျဖစ္ပါတယ္။ ဒီ Software ဟာ FAT 12, FAT 32 နဲ႔ NTFS Format ေတြေပၚမွာ အသုံးျပဳထားတဲ့ file ေတြေပၚမွာ အသုံးျပဳထားတဲ့ file ေတြကို ရွာေဖြရာမွာ အသုံး၀င္တဲ့ အခမဲ့ Freeware တစ္ခုျဖစ္ပါတယ္။


UNDELETE PLUS
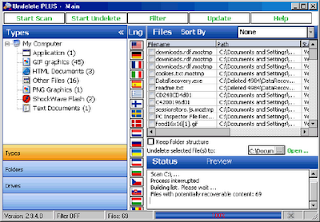

အသုံး၀င္တဲ့ Recovery Software ျဖစ္ပါတယ္။ ဒီ Software ကုိ Install မလုပ္ဘဲ အသုံးျပဳႏုိင္မွာ ျဖစ္ပါတယ္။ အသုံးျပဳရတာ လြယ္ကူတဲ့အတြက္ လူႀကိဳက္မ်ားတဲ့ စာရင္းမွာ ပါ၀င္ပါတယ္။ FAT 12, FAT 32 နဲ႔ NTFS Format ေတြသာမက USB နဲ႔ Memory Card ေတြေပၚက ဓာတ္ပုံဖုိင္ေတြကုိပါ ျပန္လည္ရွာေဖြႏုိင္မွာ ျဖစ္ပါတယ္။


PANDORA RECOVERY


အလြန္ကုိ အံ့ၾသဖုိ႔ေကာင္းၿပီး သုံးစဲြသူႏွစ္လုိဖြယ္ျဖစ္ေစမယ့္ Recovery Software ျဖစ္ပါတယ္။ Hard Disk ေပၚမွ ပ်က္ဆီးေပ်ာက္ဆုံးသြားတဲ့ Data ေတြကုိ restore ျပန္လုပ္ယူႏုိင္မွာ ျဖစ္ပါတယ္။ ဒါ့အျပင္ မွားယြင္း ဖ်က္မိတဲ့ ဖုိင္ေတြကိုလည္း Recycle Bin ထဲကေန အလြယ္တကူ ျပန္လည္ရွာေဖြႏုိင္မွာ ျဖစ္ပါတယ္။


ADRC DATA RECOVERY PLUS


အသုံးျပဳသူေတြ အလြယ္တကူ အသုံးျပဳႏုိင္မယ့္ ဒီဇုိင္းနဲ႔ ထုတ္လုပ္ထားတဲ့ software ျဖစ္ပါတယ္။ ႐ုိးရွင္းၿပီး၊ စြမ္းေဆာင္ရည္ျမင့္မားတဲ့ လူႀကိဳက္မ်ားတဲ့ software တစ္ခုျဖစ္ပါတယ္။ Install လုပ္ဖုိ႔ လုိေပမယ့္ Restore ျပဳလုပ္ရန္၊ Backup ျပဳလုပ္ရန္ႏွင့္ Hard Disk ကုိ Image File ျပဳလုပ္ရန္ လြယ္ကူမႈေတြေၾကာင့္ ထိပ္တန္း စာရင္း၀င္တဲ့ software တစ္ခုပဲျဖစ္ပါတယ္။


AVIRA UNERASE PERSONAL


Avira Antivirus က ထုတ္လုပ္တဲ့ အခမဲ့ software ျဖစ္ပါတယ္။ Delete လုပ္မိတဲ့ ဖုိင္ေတြကို အလြယ္တကူ Restore ျပန္လုပ္ႏုိင္မွာျဖစ္ၿပီး virus ဖ်က္ဆီးလုိက္သည့္ ဖုိင္ေတြကို အလြယ္တကူ Restore ျပဳလုပ္ႏုိင္မွာ ျဖစ္ပါတယ္။

Source :
(1)အင္တာနက္ဂ်ာနယ္(ဇူလုိင္ (၂၉)ရက္၊ ၂၀၁၀ ခုႏွစ္)-http://www.myanmarinternetjournal.com
(2)http://www.raymond.cc/blog/archives/2008/01/24/top-10-free-data-recovery software/



2010-07-29

Printer အတြက္ အကုန္အက်သက္သာေစရန္ (၆)ခ်က္


Printer တစ္လုံး ၀ယ္ၿပီးၿပီဆုိတာနဲ႔ အသင္က မိမိရဲ႕ Printer ကုိ ေကာင္းမြန္စြာ ထိန္းသိမ္းပါရဲ႕လား။ Computer ရဲ႕ ေဘးနားမွာ ခ်ထားၿပီး လုိအပ္တဲ့အခါမွာ ထုတ္သုံးလုိက္ၾကတာပဲ။ ဒီေတာ့ ဂ႐ုစုိက္မႈ မခံရတဲ့ Printer ေတြက ေရရွည္ အသုံးခံႏုိင္စြမ္းက်သြားေစသလုိ အကုန္အက်လည္း မ်ားျပားသြားေစပါလိမ့္မယ္။ ဒီလုိေတြ မျဖစ္ရေအာင္ ေအာက္ပါ ျပဳလုပ္ခ်က္ေလးေတြကို အနည္းငယ္ လုိက္နာၾကရေအာင္။

(၁) Printer ထုတ္လွ်င္ "Draft Mode" ကုိ ေရြးျခင္း
မိမိသည္ ကုိယ္ပုိင္စာတုိေပစေလးမ်ားကုိ ထုတ္ယူအသုံးျပဳမည္ဆုိပါက Printer အား Draft Mode ျဖင့္သာ ထုတ္ျခင္းျဖင့္ မင္ရည္အသုံးျပဳမႈကုိ အနည္းငယ္သက္သာေစသလုိ ၾကာရွည္အသုံးျပဳႏုိင္ပါတယ္။ Draft Mode အသုံးျပဳရန္အတြက္ Control Panel ထဲက Printer နဲ႔ Properties ထဲကုိ သြားၿပီး Printing Preferences ထဲက Paper Quality မွာ Draft ကုိ ေရြးခ်ယ္လုိက္ပါ။

(၂) Print Nozzle & Cartridge Cradles မ်ားအား ရွင္းလင္းျခင္း
ယခုေခတ္အေတာ္မ်ားမ်ားသာ Deskjet Printer မ်ားဟာ Nozzle နဲ႔ Cartridge ကုိ ရွင္းလင္းရန္အတြက္ အပုိပစၥည္းေလးမ်ား တစ္ခါတည္း ပါ၀င္လာတတ္ေလသည္။ ဒါေၾကာင့္ တစ္ပတ္ကုိတစ္ခါေလာက္ မိမိ Printer ရဲ႕ Nozzle နဲ႔ Cartridge Cradles မ်ားကို စစ္ေဆးသင့္သည္။ ညစ္ပတ္ေနတယ္ဆုိရင္ေတာ့ ေလမႈတ္စက္ျဖင့္ ျဖစ္ေစ၊ အရက္ပ်ံဆြတ္ထားတဲ့ ဂြမ္းေလးနဲ႔ျဖစ္ေစ သန္႔ရွင္းသင့္သည္။

(၃) Web Base Printing အား အသုံးျပဳျခင္း
အခ်ိန္နဲ႔မင္ အသုံးျပဳမႈ သက္သာေစရန္အတြက္ Manufacture မ်ားရဲ႕ software အေတာ္မ်ားမ်ား ရွိၾကပါတယ္။ ဥပမာ- HP Smart Web Printing Software စသည္တုိ႔ကို အသုံးျပဳသင့္သည္။

(၄) Cartridge မ်ား မွန္မွန္ကန္ကန္ထည့္ျခင္း
Cartridge မ်ားအားထည့္စဥ္ အထုိင္က်ေစရန္နဲ႔ ဖိတ္စင္မႈမ်ား မရွိေစရန္အတြက္ စနစ္တက် ထည့္သင့္သည္။ Original Ink ကုိသုံးပါက ပုိၿပီး အဆင္ေျပမည္။ Nozzle ေခါင္းမ်ား ေျခာက္ေသြ႕မႈ မရွိေစရန္အတြက္ သတိျပဳသင့္သည္။

(၅) စနစ္တက် Power ပိတ္ျခင္း
Printer ရဲ႕ Main Power Switch အား မပိတ္မီ Printer ရဲ႕အတြင္းပုိင္းတြင္ Run ေနေသာ Process နဲ႔ Print Head မ်ားကို ေကာင္းမြန္စြာ ပိတ္ႏုိင္မည္ျဖစ္သည္။

(၆) အရည္အေသြးေကာင္းမြန္ေသာ paper မ်ားအား အသုံးျပဳျခင္း
ညံ့ဖ်င္းတဲ့ Paper ေတြဟာ Printer ရဲ႕ စက္ပုိင္းဆုိင္ရာေတြကို Paper Jam ျဖစ္ေစျခင္းျဖင့္ ပ်က္စီးေစပါတယ္။ ဒါေၾကာင့္ အရည္အေသြးေကာင္းမြန္တဲ့ Paper မ်ားကိုသာ အသုံးျပဳသင့္ပါတယ္။

Source: NetGuide (Vol-1 ISSUE:42)31 July 2010


USB Drive ၏ လွ်ဳိ႕၀ွက္ခ်က္မ်ား


(၁) USB Drive ကုိ Custom Icon အေနျဖင့္ ေပးႏုိင္သည္။
USB Drive ကုိ Custom Icon အေနျဖင့္ သုံးစဲြေသာအခါ တစ္ခုခ်င္းသုံးစဲြတဲ့ အခါမ်ဳိးေတြမွာ ၎ Function သည္ သိသာထင္ရွားမႈ မရွိေသာ္လည္း USB Hub ကေနတစ္ဆင့္ Drive မ်ားကို အမ်ားအျပား သုံးစဲြေသာအခါတြင္ ကုိယ္ထည့္ထားေသာ အခ်က္အလက္မ်ားကို icon ျဖင့္ သီးသန္႔ခဲြျခားႏုိင္စြမ္းရွိသည္။

(၂) Chrome OS ကုိ Drive ထဲတြင္ ထည့္ထားႏုိင္သည္။
အလြယ္တကူ သယ္ယူသြားႏုိင္ေသာ Application မ်ား ေပၚေပါက္ၿပီးတဲ့ ေနာက္ပုိင္းမွာ ထုိကဲ့သုိ႔ Portable Application မ်ားဆန္ဆန္ Portable OS ( အလြယ္တကူ သယ္ယူသြားႏုိင္ေသာ စက္လည္ပတ္ေရးစနစ္ ) ကုိ Drive ထဲတြင္ ထည့္ထားၿပီး ကုိယ္သြားတဲ့ေနရာ ဥပမာ Cyber Cafe လုိမ်ဳိးတြင္ ကုိယ့္ OS ႏွင့္ ကုိယ္သုံးစဲြသည့္ အခါ လုံၿခဳံစိတ္ခ်မႈ အျပည့္အ၀ ရရွိေစႏုိင္သည္။

(၃) Portable Program ငယ္မ်ားကုိ ထည့္သြင္းသြားႏုိင္သည္။
အခ်ဳိ႕ Cyber Cafe ေတြနဲ႔ ႐ုံးေတြမွာ Hardware လုိအပ္ခ်က္ ျမင့္မားတဲ့ Software ( ဥပမာ- Photoshop ) ေတြကုိ တင္မထားတတ္ဘူး။ အဲလုိေနရာေတြမွာ ကုိယ့္ရဲ႕ Drive ထဲမွာရွိတဲ့ Portable Application က ကုိယ္လုပ္ေဆာင္ခ်င္တဲ့ လုပ္ငန္းေဆာင္တာေတြကို အေကာင္းဆုံး လုပ္ေဆာင္ႏုိင္ပါလိမ့္မယ္။

(၄) အျမန္ဆုံး ေရႊ႕ေျပာင္းႏုိင္စြမ္းရွိပါတယ္။
အခုလက္ရွိမွာ USB 2.0 ႏွင့္ 2.0 Plus ကုိ လက္ရွိ သုံးစဲြေနၾကၿပီး USB 3.0 မၾကာခင္ တစ္ေခတ္ေရာက္ေတာ့ မည္ ျဖစ္ေပမယ့္ အမွန္တကယ္တမ္းမွာ USB Drive ကုိ သုံးၿပီး USB ႏွင့္ Harddisk ၾကားမွာ အလြယ္ကူဆုံးႏွင့္ အျမန္ဆန္ဆုံး အခ်က္အလက္ေတြ ေရႊ႕ေျပာင္းေစႏုိင္ဖုိ႔ Sync back ကဲ့သုိ႔ေသာ software ကေလးကုိ ထည့္သြင္းသြားလုိက္မယ္ဆုိရင္ သာမန္အခ်က္အလက္ေတြ ေရႊ႕ေျပာင္းႏႈန္းထက္ ပုိမုိျမန္ဆန္တာကို ေတြ႕ရ ပါလိမ့္မယ္။

(၅) Windows စနစ္တစ္ခုလုံးကုိ သိမ္းဆည္းထားႏုိင္ပါတယ္။
တကယ္လုိ႔ Ubuntu ကုိ Thumb drive ထဲမွာထည့္ၿပီး Portable OS အေနနဲ႔ သုံးစဲြမယ္ဆုိရင္ အဲဒီအခ်ိန္မွာ computer မွာ Primary ရွိတဲ့ Windows OS ကုိ Temp File ေတြ ရွင္းလင္းတာ၊ Error ေတြ ရွင္းလင္းတာ၊ စနစ္ကုိ စီစဥ္တက် ျပန္လည္ဖဲြ႕စည္းတာ၊ Drive ၏ ေနရာကုိ သန္႔ရွင္းေရးလုပ္တာ စတာေတြ အကုန္လုံးကို Drive ထဲမွာ သိမ္းဆည္းထားႏုိင္ပါတယ္။ အဆင့္အနည္းငယ္ မ်ားေပမယ့္ အလြယ္တကူ နဲ႔ Recovery ျပန္လည္ လုပ္ေဆာင္ႏုိင္ပါတယ္။


Source of : NetGuide (Vol-1 ISSUE: 42) 31 July 2010


2010-07-11

Dreamweaver CS5 For Dummies


A fully updated guide to the leading Web site creation tool, Dreamweaver CS5 Dreamweaver holds 90 percent of the market share for professional Web site development software. This popular book, which has sold more than 300,000 copies in previous editions, is fully updated for the newest version of Dreamweaver. Both beginning and intermediate Web site developers will get the information they need from this easy-to-follow guide.

Dreamweaver CS5 For Dummies For Dummies
2010 | ISBN: 047061076X | 456 pages | PDF | 10 MB


Photoshop CS5 For Dummies


The bestselling guide to the leading image-editing software, fully updated Previous editions of this For Dummies guide have sold more 650,000 copies. Richly illustrated in full color, this edition covers all the updates in the newest version of Photoshop, the gold standard for image-editing programs. Used by professional photographers, graphic designers, and Web designers as well as hobbyists, Photoshop has more than four million users worldwide.* Photoshop is the image-editing software preferred by professional photographers and designers around the world; the latest version includes new functionality and enhanced tools * Teaches all the basics for first-time users, including how to work with the menus, panels, tools, options, and essential shortcuts * Covers how to fix red-eye, remove blemishes and wrinkles, remove people or objects from a photo, adjust brightness, improve color, add shadows and highlights, work with Camera Raw, decrease digital noise, create composite images, use channels and masks, optimize images for the Web, and much more Photoshop CS5 For Dummies helps both amateur and professional Photoshop users take advantage of all the program has to offer.

Photoshop CS5 For Dummies For Dummies
2010 | ISBN: 0470610786 | 432 pages | PDF | 25 MB


2010-07-08

Microsoft Windows 7 Your Way


Even the most casual computer user wants to personalize his system and get the most out of it he can. That means optimizing and customizing Windows ? to whatever extent the user is comfortable.

Users want to create a custom desktop; set their own favorite programs as system defaults; find and install cool gadgets; make sure their network is running fast and smooth; surf the Internet quickly and safely;speed up their system?s performance; and extend the use of their computers in new and unique ways. It all boils down to optimizing and customizing the way Windows works.

Windows 7 Your Way is the book that frustrated users have been waiting for. This book shows users how to get the most out of Microsoft Windows, in terms of both look and feel and performance. Readers will learn both simple and more advanced ways tocustomize various aspects of the Windows interface; extend basic Windows operation; and make their systems run as fast as possible. The focus is on optimizing Microsoft?s new Windows 7 operating system, although much of the advice is also applicable to users of previous versions of Windows.


Michael Miller ?Microsoft Windows 7 Your Way: Speed Up and Customize Windows?
December 2009 | English | ISBN-13: 978-0-7897-4286-5 | 529 Pages | PDF | 15.2 MB

Post of Nubieteky


Photoshop CS5 - Digital Classroom

Photoshop is the world as most popular image-editing software, with more than four million users worldwide. This full-color book and DVD work together to create an entire Photoshop training class that photographers, Web designers, and graphic designers can complete at their own pace. Thirteen lessons cover the features and capabilities of the newest version of Photoshop while teaching all the essential skills.

File Size: 24 MB | File Type: PDF

Post of dragan985


Java For Dummies


Start building powerful programs with Java 6?fast! Get an overview of Java 6 and begin building your own programs. Even if you're new to Java programming?or to programming in general?you can get up and running on this wildly popular language in a hurry. This book makes it easy! From how to install and run Java to understanding classes and objects and juggling values with arrays and collections, you will get up to speed on the new features of Java 6 in no time.

Publisher: For Dummies | ISBN: 0470087161 | edition 2006 | PDF | 387 pages | 14 mb

Java For Dummies by hero1021


Home Networking All-in-One Desk Reference For Dummies


If your household harbors more than one computer, you ve probably wondered about home networking. Maybe you ve gone so far as to start setting up a network and given up in frustration. Well, now you can relax. Home Networking All-In-One Desk Reference For Dummies has come to the rescue!
A network will make your life easier, and Home Networking All-In-One Desk Reference For Dummies makes it easier to create one. It shows you how to choose the right hardware, add user accounts, get different operating systems to work together, secure your network, exchange files, add wireless devices, and even use Wi-Fi out in public. Seven individual, self-contained minibooks cover:...

Home Networking All-in-One Desk Reference For Dummies
Publisher: For Dummies | ISBN: 0470275197 | edition 2008 | PDF | 720 pages | 10.9 mb

Post by Reco76


2010-07-06

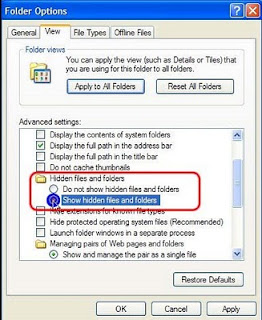
How to Enable Show Hidden Files and Folders


ကြန္ပ်ဴတာအတြင္း malware မ်ား ကပ္ညႇိျခင္းေၾကာင့္ Folder Option ေအာက္က Show Hidden Files and Folders ကုိ ဖြင့္ရန္ေရြးခ်ယ္ေပးလုိက္စဥ္ ေျပာင္းလဲမႈ မရွိဘဲ သူ႔နဂုိမူလ setting အတုိင္း Do not show hidden files and folders ကုိသာ ျပန္လည္ေရာက္ရွိေနေၾကာင္း ေတြ႕ျမင္ရမည္ျဖစ္သည္။ ယင္းသုိ႔ malware မ်ားရဲ႕ ေႏွာင့္ယွက္ ဟန္႔တားျခင္းေၾကာင့္ ျပဳျပင္ေျပာင္းလဲမႈမွန္သမွ်ကုိ တားဆီးပိတ္ပင္ေနမႈကုိ ျပန္လည္ကုစား ေပးရန္အတြက္ registry အတြင္း ၀င္ေရာက္ကုိင္တြယ္ျခင္းျဖင့္ ျပင္ဆင္ၾကည့္ႏုိင္ပါသည္။

(၁) Start မွတဆင့္ Run ကုိေရြးခ်ယ္ၿပီး regedit လုိ႔ ႐ုိက္ထည့္လုိက္ၿပီး Registry Editor ကုိ ဖြင့္ပါမယ္။

(၂) Registry Editor အတြင္း ေအာက္ပါအတုိင္း အဆင့္ဆင့္ ၀င္ေရာက္ ေရြးခ်ယ္သြားလိုက္ပါ။

HKEY_LOCAL_MACHINE\SOFTWARE\Microsoft\Windows\CurrentVersion\Explorer\ Advanced\ Folder\Hidden\SHOWALL

(၃) SHOWALL အထိ ေရြးခ်ယ္ထားလုိက္စဥ္ ညာဖက္အကြက္အတြင္းမွ CheckedValue ဆုိသည့္ စာေၾကာင္း ကုိ delete လုပ္ေပးလုိက္ပါ။

(၄) ၿပီးေတာ့ DWORD Value တစ္ခုကုိ ျပန္လည္ တည္ေဆာက္ေပးရပါမယ္။ ဒါေၾကာင့္ ယခင္ delete လုပ္ခဲ့တဲ့ အကြက္အတြင္းမွာပဲ Right Click တစ္ခ်က္ႏွိပ္၊ New > DWORD Value ကုိ ေရြးခ်ယ္ေပးလုိက္ပါမယ္။

(၅) CheckedValue ဟု ႐ုိက္ထည့္လုိက္ၿပီး၊ CheckedValue ေပၚတြင္ Double Click ႏွိပ္၍ Value Data တြင္ 1 ဟု ႐ုိက္ထည့္ေပးလုိက္႐ုံသာ ျဖစ္သည္။ ဒါဆုိရင္ My Computer ရဲ႕ Tools>Folder Options...အတြင္းက Show hidden files and folders ကုိ ေရြးခ်ယ္လုိ႔ ရသြားၿပီေပါ့။


Up