2008-12-25

Unlocker Assistant


File (သုိ႔မဟုတ္) Folder တစ္ခုခုကို မလုိအပ္လုိ႔ ဖ်က္လုိက္ေပမယ့္ တစ္ခါတစ္ရံမွာ အထက္ပါပုံအတုိင္း Error Message ေပၚတတ္ပါတယ္။ ယင္းသုိ႔ျဖစ္ရျခင္းမွာ အဲဒီ File, Folder ကုိ Windows စနစ္(သုိ႔မဟုတ္) အျခားေသာ program တစ္ခုခုက အသုံးျပဳေနရင္ ဖ်က္ခြင့္မေပးပဲ error message ေပၚလာရျခင္းျဖစ္ပါတယ္။ ယင္းသုိ႔ ျဖစ္လာ ပါက restart ျပန္လုပ္ၿပီးမွ ဖ်က္ျခင္း၊ ဒါနဲ႔မွ ဖ်က္မရျပန္ရင္ computer ကုိ safe mode မွာထားၿပီး ဖ်က္ျခင္းတုိ႔ကုိ ျပဳလုပ္မွသာ အဆင္ေျပသြားတတ္ပါတယ္။

ပုိ၍လြယ္ကူသည္မွာ Unlocker Assistant ကုိ အသုံးျပဳျခင္းျဖင့္ ပုိမုိထိေရာက္မႈ ရွိေစပါတယ္။ မိမိဖ်က္လုိေသာ File (သုိ႔မဟုတ္) Folder ေပၚတြင္ Right Click ႏွိပ္ၿပီး ေပၚလာ Menu ေပၚတြင္ Unlocker ကုိ ေရြးခ်ယ္ Click ႏွိပ္လုိက္ပါ။ ထုိအခါ အသုံးျပဳရန္အတြက္ No Action, Delete, Rename, Move လုပ္ရန္ ေပၚလာပါမည္။ ဖ်က္မည္ဆုိပါက Action တြင္ Delete ကုိ ေရြးၿပီး OK ကုိ Click ႏွိပ္ျခင္းအားျဖင့္ အလြယ္တကူ ဖ်က္၍ရသြားပါ တယ္။


Click Here to Download : Unlocker 1.8.7 (238 KB)
Source of : http://ccollomb.free.fr/unlocker/

2008-11-18

Windows XP Setup Simulator


Windows XP Setup Simulator သည္ Program တစ္ခုျဖစ္ၿပီး Windows XP ကုိ ဘယ္လုိ Install လုပ္မလဲ ဆုိတာကို သင္ၾကားျပသေပးပါတယ္။ Computer ရဲ႕ Hardware နဲ႔ Software အခက္အခဲမ်ားကိုလည္း စုိးရိမ္ စရာမလုိပါဘူး။ အမွန္တကယ္ Windows Install လုပ္ေနသကဲ့သုိ႔ ထင္ရေပသည္။ အဆင့္တုိင္းကုိ တိက်စြာနဲ႔ Windows တင္စဥ္အတြင္းတြင္ Restart မျဖစ္ေစဘဲ ျပန္လည္ေဖာ္ျပေပးပါတယ္။ ၎ program ကုိ အသုံးျပဳ၍ Windows 2003 တြင္လည္း သင္ၾကားေရးအတြက္ လမ္းညႊန္အျဖစ္ အသုံးျပဳႏုိင္ပါတယ္။ Package အတြင္းတြင္ e-book မ်ားပါ၀င္ၿပီး အျခား Windows အေျခခံႏွင့္ Windows တင္နည္းအဆင့္ဆင့္တုိ႔အား လြယ္ကူစြာ ရွင္း လင္း ျပထားပါတယ္။
download here: Windows XP Setup Simulator (1.23 MB)
More details: http://www.echoproject.net/

2008-11-17

iRepairMan

iRepair Man


iRepair Man Program ေလးဟာ စြမ္းေဆာင္ရည္ေကာင္းမြန္သေလာက္ အခမဲ့ download အေနႏွင့္ပါ ရယူႏုိင္ပါတယ္။ ကုိထိန္လင္းထူး က ေရးသားထားၿပီး http://www.isoft.ygn.cc/ မွာ download ခ်ယူႏုိင္ ပါတယ္။ iRepair Man ကုိ အသုံးျပဳၿပီးေတာ့ Folder Option, Registry Editor, Task Manager, Hidden Files နဲ႔ File Extension မ်ားကုိ ျပန္ဖြင့္ေပးႏုိင္ပါတယ္။
To Download:
iRepairMan.exe (1,273 KB)
iRepairMan.zip (1,220 KB)
C++ Source.zip (497 KB)
Guide Par1 (952 KB)
Happy Birthday Virus Article.pdf (92 KB)

2008-10-06

Error Messages


My Computer ရဲ႕ Tool menu မွ Folder Option Command ေပ်ာက္ေနၿပီး Show/Hidden folders and files စတဲ့ function မ်ားကုိ သုံး၍မရေတာ့ပါ။

Start menu ရွိ Run box ထဲတြင္ regedit ႐ုိက္၍ Registry ကုိ ဖြင့္ရာတြင္လည္း ေအာက္ပါအတုိင္း Regisrty editing has been disabled by your administrator. ဆုိတဲ့ Registry Editor မွ Alert တစ္ခု တက္လာၿပီး regedit ကုိ ဖြင့္မရပါ။


Ctrl+Alt+Del key မ်ားကို တဲြႏွိပ္ၿပီး Task Manager ကုိ ဖြင့္ရန္ႀကိဳးစားၾကည့္ေသာအခါတြင္လည္း Task Manager has been disabled by your administrator. ဟူေသာ message box တစ္ခုတက္လာၿပီး ဖြင့္မရျပန္ပါ။


Removing the Disable Registry Tools restriction:


Method 1: Using the REG.EXE console tool

Registry Editor ကုိ ျပန္လည္ဖြင့္ရန္အတြက္ ပထမဦးစြာ-
(1) Start ကုိ Click ႏွိပ္ၿပီး Run တြင္ ေအာက္ပါအတုိင္း command တစ္ေၾကာင္းကုိ ႐ုိက္ထည့္ပါ။


Method 2: Using the Group policy editor

(1) Start ကုိ Click တစ္ခ်က္ႏွိပ္ၿပီး Run တြင္ gpedit.msc ဟူ၍ ႐ုိက္ထည့္ၿပီး Enter ႏွိပ္ပါ။

(2) User Configuration | Administrative Templates | Windows Components | Windows Explorer

ဟူ၍ အဆင့္ဆင့္ ေရြးခ်ယ္ၿပီး System ရဲ႕ Setting အကြက္ထဲရွိ Prevent access to registry editing tools ကုိ double click ႏွိပ္ၿပီး Not Configured ကုိ click ႏွိပ္ေရြးခ်ယ္ၿပီး Group Policy Editor မွ Exit လုပ္ပါ။

ဤနည္းလမ္းမ်ားျဖင့္ Registry အား ပိတ္ထားျခင္းမွ ျပန္လည္ဖြင့္ႏုိင္ပါမည္။

ထုိအခါ Registry ကုိ အသုံးျပဳႏုိင္ၿပီျဖစ္သျဖင့္ My Computer ရဲ႕ Tools menu မွ Folder Options ေပ်ာက္ေနသည့္ျပႆနာကို ေျဖရွင္း၍ရႏုိင္ပါၿပီ။

Folder Options missing from Tools menu in Windows Explorer

Method 1: Using the REG.EXE console tool

Registry Editor ကုိ ျပန္လည္ဖြင့္ရန္အတြက္ ပထမဦးစြာ-
(1) Start ကုိ Click ႏွိပ္ၿပီး Run တြင္ regedit ဟု ႐ုိက္ထည့္ၿပီး OK ကုိ Click ႏွိပ္ပါ။
ထုိ႔ေနာက္ ေအာက္ပါအတိုင္း တစ္ဆင့္ခ်င္း ဖြင့္သြားပါ။

HKEY_CURRENT_USER \ Software \ Microsoft \ Windows \ CurrentVersion \ Policies \ Explorer

ဆုိတဲ့ စာသားေပၚကုိ Double Click ႏွိပ္ပါ။ ထုိအခါ ညာဘက္ရွိ ျမင္ကြင္းအတြင္း NoFolderOptions ဟူေသာ value ကုိေတြ႕လွ်င္ delete လုပ္လုိက္ပါ။

(တစ္ခုသတိျပဳရန္မွာ registry editor သုိ႔ ၀င္၍ regisrty မ်ားကို ျပင္ျခင္းသည္ အႏ ၱရာယ္မ်ားေသာ မျပဳျပင္မီ ႀကိဳတင္ၿပီး backup လုပ္ထားသင့္ပါတယ္။)


HKEY_LOCAL_MACHINE \ Software \ Microsoft \ Windows \ CurrentVersion \ Policies \ Explorer

တြင္လည္း value မ်ားရွိပါက delete လုပ္ပစ္လုိက္ ႏုိင္ပါတယ္။


Method 2: Using the Group policy editor

(1) Start ကုိ Click တစ္ခ်က္ႏွိပ္ၿပီး Run တြင္ gpedit.msc ဟူ၍ ႐ုိက္ထည့္ၿပီး Enter ႏွိပ္ပါ။

(2) User Configuration | Administrative Templates | Windows Components | Windows Explorer


ဟူ၍ အဆင့္ဆင့္ေရြးခ်ယ္ၿပီးေနာက္ Remove the Folder Options menu item from the Tools Menu ေပၚတြင္ double click ႏွိပ္ၿပီး Not Configured ကုိ click ႏွိပ္ေရြးခ်ယ္ၿပီး Group Policy Editor မွ Exit လုပ္ပါ။

ဤနည္းလမ္းမ်ားျဖင့္ My computer ရဲ႕ Folder Option ေပ်ာက္ေနျခင္းမွ ျပင္ဆင္ၿပီးပါၿပီ။


Removing the Disable Task Manager Tools restriction:

Method 1: Using the REG.EXE console tool
Ctrl+Alt+Del key မ်ားကိုႏွိပ္ၿပီး Task manager ရဲ႕ ဖြင့္ရန္အတြက္ ပထမဦးဆုံး Start > Run တြင္ ေအာက္ပါအတုိင္း ႐ုိက္ထည့္လုိက္ပါ။


Method 2: Using the Group policy editor

(1) Start ကုိ Click တစ္ခ်က္ႏွိပ္ၿပီး Run တြင္ gpedit.msc ဟူ၍ ႐ုိက္ထည့္ၿပီး Enter ႏွိပ္ပါ။

User Configuration / Administrative Templates / System / Ctrl+Alt+Delete Options / Remove Task Manager

ဟူ၍ အဆင့္ဆင့္ ေရြးခ်ယ္သြားၿပီး Remove Task Manager ေပၚတြင္ double click ႏွိပ္ပါ။

(2) ထုိ႔ေနာက္ Not Configured ေပၚတြင္ click ႏွိပ္ေရြးခ်ယ္ၿပီး Group Policy Editor မွ Exit လုပ္ပါ။
ထုိအခါတြင္ Ctrl+Alt+Del key မ်ားလည္း သုံး၍ ရသြားေပလိမ့္မည္..။

2008-09-29

PDF သုိ႔ ေျပာင္းလဲျခင္း(၂)

doPDF Software သည္ Free Converter version တစ္ခုျဖစ္ၿပီး တစ္ကုိယ္ေရသုံးႏွင့္ လုပ္ငန္းသုံးႏွစ္မ်ဳိး စလုံးအတြက္ သုံးႏုိင္ပါသည္။ ယင္း program ကုိ အသုံးျပဳ၍ သင့္ရဲ႕ Microsoft Word, Exce, Powerpoint မ်ားကုိ PDF သုိ႔ ေျပာင္းလဲေပးႏုိင္႐ုံသာမက e-mails ႏွင့္ အျခားသင္ႏွစ္သက္ရာ websites မ်ားကိုလည္း PDF သို႔ ေျပာင္းလဲေပးႏုိင္ေပေသးသည္။
Microsoft Word မွ PDF သုိ႔ေျပာင္းလဲရန္-
(၁) PDF ျပဳလုပ္လုိေသာ File ကို Open လုပ္ထားပါ။
(၂) ထုိ႔ေနာက္ File > Print ကုိ ႏွိပ္ၿပီး combo-box မွ doPDF ကုိ ေရြးခ်ယ္ပါ။
(၃) ထပ္မံၿပီး Ok ကုိ Click ႏွိပ္ပါ။


To download doPDF

More Details: http://www.dopdf.com/

2008-09-28

10 Traffic Tips and Traffic Secrets Result Detection Technique

I just finished watching this video from a link on Yaro Starak's blog about 10 traffic tips of John Reese on his Traffic Secrets 2.0 video. It's a free presentation video as a preview series for the launch of John's Traffic Secrets 2.0 course. The presentation of the video is very professional with very cool technical background presentation.

I've learned a lot upon viewing the video. He calls these ten traffic secrets as "Result Detection" techniques. This is simply just tapping into the power of the internet, figuring all the techniques that are working from other people's site that allows them to gain more positive results. It's basically understanding what these techniques are, doing it in a different way and keep on improving upon what they already had been using.


These are some of the traffic techniques included in “Traffic Secrets 2.0” course.


Result Detection #1
See who's ranking on the top 10 on Google and use different services to analyze all the incoming links to the sites.

Result Detection #2
If you're making a software - go to download.com and see the number of downloads and reviews of softwares in your category and figured it out what people want in a software or freeware.

Result Detection #3
Post on front page of Digg - examine the history of digg and look for post on the home page and figured out why a post got a lot of diggs. Examine what types of post in a community are voting on.

Result Detection #4
On social networks sites - look for people who has lot of friends and figured out how he get those numbers.

Result Detection #5
Google adwords - monitor the competitors in your niche and observe their ads. Look for trends of headlines or techniques that others are doing and emulate them.

Result Detection #6
At eBay - find out what the most popular keywords are and what type of items selling the most.

Result Detection #7
Press Releases - look at successful press releases being published and go with the techniques their using. Example using PRWeb.

Result Detection #8
Get tons of links on blog - use Technorati to figure it out which blogs are getting the most incoming links and how they get those links. Create a blog post in your niche the same type of posts that are getting lots of links.

Result Detection #9
Compete.com - use the site to get reports of sites getting the most traffic and figured out how they're getting it. Do something similar and get results.

Result Detection #10
Banner ads - know what your competitor ads look like on sites like Commission Junction. Examine and do the same strategy their using in their ads.

I did not know that the sites like CJ.com, Compete.com, eBay.com, PRWeb.com, Download.com, Technorati.com and Digg.com are great sites to find ways where the traffic are on the web. All I know is that these are popular and good sites until I saw the video. It allows people to understand how people sites take advantage from their services to get more traffic.

These are just some of the practical methods we can apply, but are most valuable techniques to gain more traffic on our sites.

Posted by


Source of http://www.infinitewebprofit.com

2008-08-14

Bit Rate မ်ားကို ေလ့လာျခင္း

သင္ဟာ Audio နဲ႔ ပတ္သက္တဲ့လုပ္ငန္းေတြကို စိတ္၀င္စားသူ တစ္ေယာက္ ဆုိရင္ wave ေတြရဲ႕ ကြာျခားမႈ၊ Recording လုပ္တဲ့အခါ Bit Rate ေတြရဲ႕ ကြာျခားမႈေတြကို အထုိက္အေလ်ာက္ သိထားသင့္ပါတယ္။ Audio Recording လုပ္ငန္းအတြက္ bit rate ေတြ ကြာျခားမႈဟာ အလြန္အေရးႀကီး ပါတယ္။ Recording လုပ္တဲ့အခါမွာ bit rate ေတြမွန္ကန္ဖုိ႔ဟာ အလြန္အေရးႀကီးပါတယ္။ သီခ်င္းတစ္ပုဒ္ကို Select လုပ္ၿပီး Right Click မွတစ္ဆင့္ Properties ကုိ ဖြင့္လုိက္ပါ။ CD တစ္ခ်ပ္ရဲ႕ bit rate ကုိ ၾကည့္မယ္ဆုိရင္ 16 bit ရွိပါတယ္။ Bit rate ဆုိတာဟာ binary digit ေတြရဲ႕ rate (ႏႈန္းထား) မ်ားျဖစ္ပါတယ္။ CD တစ္ခ်ပ္ဟာ တကယ္ေတာ့ digital form ပဲ ျဖစ္ပါတယ္။ တကယ္လုိ႔ အေၾကာင္းအမ်ဳိးမ်ဳိးေၾကာင့္ သင္ဟာ recording လုပ္ရမယ္ဆုိရင္ bit rate နဲ႔ ႀကဳံေတြ႕ရမွာပါ။ သာမန္ recording လုပ္႐ုံကေတာ့ 16 bit ကုိ ေရြးခ်ယ္လုိက္ ပါ။ Professional လုပ္ငန္းအတြက္ကေတာ့ အသံတစ္သံကို ဖမ္းရာမွာ 16 bit သုိ႔မဟုတ္ 32 bit ကုိ ေရြးခ်ယ္ၾကပါတယ္။ Bit rate ေတြရဲ႕ ကြာျခားမႈေၾကာင့္ အသံေတြဟာလည္း ကြာျခားႏုိင္ပါတယ္။ အသုံး အမ်ားဆုံးကေတာ့ 16 bit ပဲ ျဖစ္ပါတယ္။
တစ္ခ်ဳိ႕ MP4 ေတြမွာ Recording System ပါ၀င္ပါတယ္။ အဲဒီလုိဖမ္းထားတဲ့ အသံေတြကို computer ေပၚ တင္ၿပီး CD ျပန္ကူးမယ္ဆုိလွ်င္ေတာ့ အရည္အေသြးေကာင္းမြန္ေစရန္အတြက္ bit rate ေတြကုိ ျပန္လည္ ျပင္ဆင္ႏုိင္ပါတယ္။ MP4 ရဲ႕ recording format ဟာ 8 bit ပဲရွိပါတယ္။ တကယ္ေတာ့ 8 bit ဟာ အရည္ အေသြး အလြန္ည့ံပါတယ္။ ဒါေပမယ့္ file size ေသးတဲ့အတြက္ အခ်ိန္ၾကာျမင့္စြာ အသံဖမ္းယူႏုိင္ပါတယ္။ CD ျပန္ကူးမယ္ဆုိလွ်င္လည္း တခ်ဳိ႕စက္ေတြမွာ ဖြင့္လုိ႔မရတာမ်ဳိးေတြ ႀကဳံေတြ႕ႏုိင္ပါတယ္။ အေကာင္းဆုံး ျဖစ္ေစဖုိ႔အတြက္ ဒီ record လုပ္ထားတဲ့ data ေတြကို wavelab မွ တဆင့္ ျပန္လည္ျပဳျပင္ယူႏုိင္ပါတယ္။ 16 bit ျဖစ္ေစရန္အတြက္ wavelab မွ open ဖြင့္ၿပီး encoding ျပန္လုပ္တဲ့အခါမွာ 16 bit 44 kHz ကုိ ေရြး ေပးလုိက္ပါ။ ဒါဆုိရင္ အဆင္ေျပဆုံး wave file တစ္ခု ျဖစ္သြားပါၿပီ။ MP3 အေနနဲ႔ကေတာ့ 128 kbps, 44 kHz ဟာ အေကာင္းဆုံးပါပဲ။ Bit rate မ်ားျခင္းဟာ အသံရဲ႕ gain ကုိ ေကာင္းေစႏုိင္တာမွန္ေပမယ့္ file size ကိုေတာ့ ႀကီးေစပါတယ္။ Data file အေနနဲ႔ကေတာ့ တစ္ခါတစ္ရံမွာ 16 bit, 48 kHz ကုိ သုံးပါတယ္။
တစ္ခါတရံမွာ bit rate ေတြ မမွန္တဲ့အတြက္ CD ကူးတာမ်ဳိး MP3 ေခြ ျပဳလုပ္တဲ့အခါမွာ ျပန္ဖြင့္လုိ႔ မရတာ မ်ဳိးေတြ ျဖစ္တတ္ပါတယ္။ တကယ္လုိ႔ သင့္ရဲ႕ computer မွာ MP3 producer (သို႔) Audio Grabber စတဲ့ software ေတြ တင္ထားမယ္ဆုိရင္ေတာ့ အလြယ္တကူ ျပဳျပင္ယူလုိ႔ ရႏုိင္ပါတယ္။ ဒါေပမယ့္ အဲဒီ software ေတြဟာ Editing လုပ္လုိ႔ မရပါဘူး။ တကယ္လုိ႔ သင္ဟာ editing ပါ လုပ္ခ်င္တယ္ဆုိရင္ေတာ့ WaveLab (သို႔) Sound Forge ကုိသုံးတာ အဆင္ေျပေစပါတယ္။

Ref: Sanay Oo
Thursday, July 31, 2008
Internet Journal

2008-08-10

Windows XP Registry Guide E-book

Jerry Honeycutt's, Windows XP Registry Guide, is an invaluable resource for any XP user. Two registry guides. I read for previous Windows operating systems were a total waste of money. This book, however, is worth buying at any price.The Windows XP Registry Guide takes a systematic approach to learning and using registry tools to get the most out or your XP system. Novice users will learn enough to make the book worthwhile by reading just the first section (five chapters), but once you get that far you will want to read it all. Jerry is careful to warn about careless hacking and thoroughly covers backing up and restoring the registry using tools already included in Windows XP and several third party tools. I was surprised to learn how useful Microsoft's Word application is in managing changes made to the registry.


Download Link:
http://rapidshare.com/files/90314468/Microsoft_Windows_XP_Registry_Guide.rar
Pass:passiondownload.com

Source of http://whereweget.com/2008/02/26/windows-xp-registry-guide-e-book.html

2008-08-02

Windows ၏ Send To Menu တြင္ Destinations အသစ္မ်ား ထပ္မံေပါင္းထည့္ျခင္း

Windows ထဲတြင္ရွိေသာ Send To Command သည္ ဖုိင္မ်ားအား တစ္ေနရာမွ အျခားတစ္ေနရာသို႔ ေရႊ႕ေျပာင္းရာတြင္ အသုံးျပဳပါသည္။ အသုံးျပဳသူ အေနျဖင့္လည္း ၎ Command အား အသုံးျပဳရာတြင္ ပုံေသ Default Destination မ်ားကိုသာ အသုံးျပဳႏုိင္မည္ျဖစ္သည္။ ပုံေသပါ၀င္မႈ စာရင္းမ်ားအေနျဖင့္ ဥပမာ- Compressed (zipped) Folder, Desktop (create shortcut), Mail Recipient, My Documents, CD/DVD Drive ဟူ၍ တစ္ခုခု ျဖစ္ႏုိင္ပါသည္။ ၎ command မ်ားသည္ Default ပါရွိမႈ မ်ားသာ ျဖစ္ေပသည္။ အကယ္၍ သင့္အေနျဖင့္ အခ်က္အလက္မ်ားအား အျခားေနရာတစ္ခုဆီသုိ႔ သယ္ယူေရႊ႕ေျပာင္းမႈ ပုိမုိ၍ ျမန္ဆန္ေစရန္အတြက္ Send To Lists တြင္ Destinations အသစ္မ်ားအား ထပ္မံၿပီး ေပါင္းထည့္ေပး ထားႏုိင္ပါေသးသည္။ ပထမဦးစြာ-
(1) Start ကုိ Click တစ္ခ်က္ႏွိပ္ၿပီး Run ကုိ Click ႏွိပ္ေရြးခ်ယ္ပါ။
(2) Run Option Box ထဲတြင္ sendto ဟူ၍ ႐ုိက္ထည့္ၿပီး OK ကုိ Click ႏွိပ္ေရြးခ်ယ္လုိက္ပါ။
(3) ထုိအခါ Send To Dialog Box တစ္ခုေပၚလာၿပီး ၎ Folder ထဲသို႔ မိမိစိတ္ႀကိဳက္ Program, Folders ႏွင့္ Drives Shortcuts မ်ားအား Mouse ကုိ ဖိဆဲြၿပီး Drag-and Drop (သုိ႔) Copy and Paste နည္းကုိသုံးၿပီး ေရႊ႕ေျပာင္းလုိက္ႏုိင္ပါသည္။ ထုိအခါ သင္ဖန္တီးလုိက္ေသာ New Shortcut အသစ္ဆီသုိ႔ သင္ေရႊ႕ေျပာင္းလုိသည့္ ဖုိင္တစ္ခုေပၚတြင္ Right-Click ႏွိပ္ၿပီး ေရြးခ်ယ္အသုံးျပဳ ႏုိင္ၿပီျဖစ္ပါသည္။
(4) သင့္အေနျဖင့္ ၎ Command မ်ားအား မႀကိဳက္၍ ဖ်က္ပစ္မည္ ဆုိပါကလည္း အထက္ပါနည္းလမ္းအတုိင္း အဆင့္ဆင့္၀င္ေရာက္ေရြးခ်ယ္ၿပီး Delete လုပ္ျခင္းအားျဖင့္ ဖ်က္ပစ္လုိက္ႏုိင္ပါသည္။

Web Page မ်ားကုိ PDF ဖုိင္အျဖစ္ သိမ္းဆည္းထားျခင္း

အင္တာနက္စာမ်က္ႏွာမ်ားမွ PDF အျဖစ္ ျပဳလုပ္သိမ္းဆည္းရန္မွာ Software မ်ားစြာရွိသည့္အနက္မွ လြန္စြာ လြယ္ကူလ်င္ျမန္လွေသာ software တစ္ခုမွာ CutePDF Creator ပင္ျဖစ္ပါတယ္။ CutePDF Software မွာ အျခားေသာ Print ထုတ္ယူႏုိင္ေသာ Software မ်ားစြာမွလည္း PDF ေျပာင္းေပးႏုိင္ပါေသး သည္။ အသုံးျပဳပုံမွာ Print ထုတ္ယူလုိေသာ Website အား ဖြင့္ထားၿပီး File Menu မွ Print ကုိ ေရြးခ်ယ္ေပးၿပီး ဆက္လက္၍ Printer Name Box ထဲတြင္ CutePDF Writer ကုိ ေရြးခ်ယ္ေပးၿပီး OK ကုိ ႏွိပ္ျခင္းအားျဖင့္ PDF File တစ္ခုကို ျပဳလုပ္ေပးႏုိင္ပါတယ္။

Create professional quality PDF files from almost any printable document. FREE for personal, commercial, gov or edu use! No watermarks! No popup Web ads! Now supports 64-bit Windows.

Download:
CutePDF Writer
http://www.cutepdf.com/download/CuteWriter.exe
Free Download (1.6 MB) (Vista Ready)

2008-07-31

PageMaker Software အေၾကာင္း တစ္ေစ့တစ္ေစာင္းႏွင့္ ၎၏ အနာဂတ္

အခ်ိန္ကာလတစ္ေလွ်ာက္လုံး စာစီစာ႐ုိက္လုပ္ငန္းသမား အားလုံးလုိလုိက အသုံးျပဳေနၾကတဲ့ စာစီ (work processing software) ဟာ PageMaker ပဲ ျဖစ္ပါတယ္။ စာစီစာ႐ုိက္လုပ္ငန္းမ်ားရဲ႕ 90% ေလာက္ ရွိမယ္ ထင္ပါတယ္။ ဒါေပမယ့္ အဲဒီ Pagemaker Software ကုိ ဘယ္သူကေရးသားခဲ့တယ္၊ ဘယ္ Company က ထုတ္လုပ္ခဲ့တယ္၊ ဘယ္ ခုႏွစ္က စတင္ခဲ့တယ္၊ ေရွ႕ဆက္ၿပီး ဘယ္လုိ အဆင့္ျမႇင့္ Version ေတြ ထြက္လာဦး မယ္ဆုိတာ မသိတဲ့သူက မ်ားပါတယ္။ သိဖို႔လည္း မလုိဘူးလုိ႔ ေျပာၾကပါတယ္။ ဘာပဲျဖစ္ျဖစ္ ကုိယ္လုပ္ေနတဲ့ လုပ္ငန္းရဲ႕ သေဘာသဘာ၀နဲ႔ သမုိင္းေၾကာင္းကိုေတာ့ သိထားသင့္တယ္လုိ႔ ထင္ပါတယ္။ ဒါေၾကာင့္လည္း PageMaker Software ရဲ႕ အေၾကာင္းရင္းျမစ္ကို ရွာေဖြေရးသားလုိက္ပါတယ္။
PageMaker Software အေၾကာင္းမစခင္ Adobe System Inc တည္ေထာင္ခဲ့တာကုိ ၾကည့္ရေအာင္။ John Warnock နဲ႔ အဖဲြ႕ဟာ Xerox PARC လုိ႔ေခၚတဲ့ ဘာသာစကား Software တစ္ခုကို တီထြင္ ေရးသားခဲ့ပါတယ္။ ၎ Software ဟာ Computer မွာ စာစီထားတဲ့ စကားလုံးေတြကို Laser Printer ေတြမွာ အဆင္ေျပ လွပအခ်ဳိးက်ေအာင္ သုံးႏုိင္ဖုိ႔ ေဆာင္ရြက္ေပးတဲ့ Page Description Language ဆုိပါ ေတာ့။ ဒါေပမယ့္ Warnock ရဲ႕ တီထြင္မႈကို Xerox က အေလးမထားခဲ့ပါဘူး။ ဒီလုိနဲ႔ Warnock ဟာ 1982 ခုႏွစ္မွာ Xerox က ခဲြထြက္ခဲ့ၿပီး Adobe System Inc. ကို တည္ေထာင္ခ့ဲပါတယ္။ အတိအက် ဆုိရင္ေတာ့ system Inc. ကုိ 1982 ခုႏွစ္၊ December လမွာ ကယ္လီဖုိးနီးယားအရပ္မွာ တည္ေထာင္ခဲ့ တာျဖစ္ၿပီး အျခား တဲြဖက္ပါ၀င္သူမွာ Charles Geschke ဆုိသူ ျဖစ္ပါတယ္။ Adobe ဆုိတဲ့ အမည္ကုိ Adobe Creek လုိ႔ေခၚတဲ့ သူတို႔ရဲ႕ Company နဲ႔ မလွမ္းမကမ္းအရပ္နားမွာရွိတဲ့ ေခ်ာင္းငယ္ကေလးရဲ႕ အမည္ကုိ ယူလိုက္ တာပါ။
John Warnock

PostScript ဘာသာစကား Software ဟာ Adobe ရဲ႕ ပထမဆုံးေသာ ထုတ္လုပ္မႈတစ္ခု ျဖစ္ပါတယ္။ အဲဒီအခ်ိန္မ်ားမွာ အဆုိပါ software ကုိ Company အနည္းစုကသာ အသုံးျပဳခဲ့ပါတယ္။
Adobe ကုိ တည္ေထာင္တဲ့ အခ်ိန္ကာလမ်ားမွာ ကမ​ ၻာတစ္၀န္း Personal Computer လုိ႔ေခၚတဲ့ တစ္ဦးခ်င္းသုံး computer မ်ားကို အလုံးအရင္းနဲ႔ ထုတ္လုပ္ေနၾကပါၿပီ။ 1975 ခုႏွစ္က MITS မွ computer ၀ါသနာရွင္မ်ားအတြက္ ရည္ရြယ္ၿပီး ထုတ္လုပ္လုိက္တဲ့ Altair Computer ကေလးကေန အစျပဳလုိက္တာ Apple ရဲ႕ ပန္းသီးတံဆိပ္ computer မ်ား၊ IBM ရဲ႕ PC မ်ားနဲ႔ အျခားေသာ company အမ်ားအျပားက computer ေတြ အၿပိဳင္ ေပၚေပါက္ေနတဲ့ အခ်ိန္လည္း ျဖစ္ပါတယ္။ 1984 ခုႏွစ္မွာ Apple က ထုတ္လုပ္တဲ့ Macintosh Computer နဲ႔အတူ Apple က Laser Writer ေခၚ Laser Printer မ်ားကိုလည္း ထုတ္လုပ္ခဲ့ ပါတယ္။ အဆုိပါ Macintosh Computer နဲ႔ Laser Printer တုိ႔ ခ်ိတ္ဆက္အသုံးျပဳရာမွာ Apple က Adobe ရဲ႕ PostScript Software ကို လုိင္စင္ယူၿပီး ထည့္သြင္းအသုံးျပဳခဲ့ပါတယ္။ အဆင္ေျပခ်င္ေတာ့ Computer နဲ႔ Laser Printer တစ္စုံကို ေဒၚလာ 9,000 နီးပါးနဲ႔ ေရာင္းခဲ့တာေတာင္ Computer သမားေတြ က ေစ်းႀကီးတယ္လုိ႔ မထင္ခဲ့ပါဘူး။ Desktop Publishing လုပ္ငန္းေတြလည္း ေခတ္စားလာတဲ့ အခ်ိန္ လည္း ျဖစ္ပါတယ္။ Adobe ရဲ႕ ေနာက္ထုတ္တဲ့ Software က Adobe Illustrator နဲ႔ Photoshop Software မ်ား ျဖစ္ပါတယ္။

Aldus Corporation
Paul Brainerd

Aldus Corporation ကို Paul Brainerd ဆုိသူက 1985 ခုႏွစ္မွာ တည္ေထာင္ခဲ့ပါတယ္။ Aldus ဟူေသာ အမည္ကို ယူရျခင္းမွာ 1495 ခုႏွစ္က Aldine Press ပုံႏွိပ္လုပ္ငန္းကုိ တည္ေထာင္ခဲ့သူ Aldus Manutius ကုိ ေလးစားအမွတ္ရေစရန္ ျဖစ္ပါတယ္။ Aldus ဟာ ပုံႏွိပ္လုပ္ငန္းကို ေခတ္မီေအာင္ ေျပာင္းလဲ တီထြင္ခဲ့သူ ျဖစ္ပါတယ္။
ပထမဆုံးလုိ႔ ဆုိရမည့္ PageMaker Software ကုိ Aldus Corporation မွ ထုတ္လုပ္ခဲ့ပါတယ္။ Company ကုိတည္ေထာင္သူ Paul Brainerd က တီထြင္ေရးသားခဲ့တာျဖစ္ၿပီး Aldus PageMaker Version 1.0 လုိ႔ အမည္ေပးထားပါတယ္။ ၎ Software ကို Apple Company ရဲ႕ Macintosh Computer မ်ားမွာ အသုံးျပဳ ရန္ 1985 ခုႏွစ္၊ July လမွာ စတင္ျဖန္႔ခ်ိခဲ့၍ IBM ၏ Computer မ်ားတြင္ အသုံးျပဳရန္ 1986 ခုႏွစ္၊ December လတြင္ ျဖန္႔ခ်ိခဲ့ပါတယ္။
PageMaker 1.0 မွာ စာမ်က္ႏွာဖဲြ႕စည္းတာ၊ ေနရာခ်တာ၊ စာကြက္မ်ား (Layer) မ်ားကို ေနရာအမ်ဳိးမ်ဳိး သုိ႔ ေရႊ႕တာ စသည္ျပဳလုပ္ႏုိင္ပါတယ္။ စာစီ႐ုံသာမက ပုံဆဲြဖုိ႔လည္း Tools ေတြ ပါပါတယ္။ အျခားေသာ စာစီ Software ေတြက ပုံနဲ႔စာသားေတြကိုလည္း ေရႊ႕ေျပာင္းထည့္သြင္းႏုိင္ပါတယ္။ အဲဒီ အခ်ိန္ကာလမ်ား မွာ Desktop Publishing လုိ႔ေခၚတဲ့ စာအုပ္ထုတ္လုပ္တဲ့လုပ္ငန္းတစ္ခုလုံးကုိ အျပည့္အ၀ ေဆာင္ရြက္ မေပးႏုိင္သည့္တုိင္ Computer အသုံးျပဳသူေတြ (သုိ႔) စာစီစာ႐ုိက္သူေတြရဲ႕ အႀကိဳက္ကို ျဖစ္ေစခဲ့ပါတယ္။ ပထမဆုံးေသာ Desktop Publishing Software လုိ႔လည္း ေျပာႏုိင္ပါတယ္။ Apple ရဲ႕ Macintosh Computer မ်ားနဲ႔အတူ နာမည္ရခဲ့ပါတယ္။ Aldus မွ ဆက္လက္ၿပီး FreeHand Illustration Software နဲ႔ PageMaker Version 4.2, Version 5 တုိ႔ကို ဆက္လက္ထုတ္လုပ္ခဲ့ပါတယ္။ အဲဒီမွာေတာ့ စာေၾကာင္း မ်ားကို မည္သည့္ဘက္သုိ႔မဆုိ လွည့္ေျပာင္းႏုိင္ျခင္း၊ Story Editor နဲ႔ အေရာင္ျခယ္သမႈ စတဲ့ စြမ္းေဆာင္ ႏုိင္ခ်က္မ်ား ပါ၀င္လာပါတယ္။

အျခားေသာ စာစီ Software မ်ား


PageMaker Software ဟာ 1985 ခုႏွစ္ (သုိ႔) 1986 ခုႏွစ္မွာ စတင္ေပၚေပါက္ခဲ့တာျဖစ္ေပမယ့္ ၎ အခ်ိန္ကာလမ်ားမွာ စာစီ Software ေတြ ရွိေနၿပီျဖစ္ပါတယ္။ အထူးသျဖင့္ 1979 ခုႏွစ္ကတည္းက စတင္ နာမည္ရလာခဲ့တဲ့ Micro International မွ Seymour Rubin Stein ရဲ႕ WordStar စာစီ Software ဟာ ႏွစ္ အတန္ၾကာ စာစီ software ေစ်းကြက္ကို ႀကီးစုိးခဲ့ပါတယ္။ ယခုတုိင္ အခ်ဳိ႕ေသာ ႏုိင္ငံေတြမွာ WordStar Version 7.0 ကုိ သုံးေနၾကတုန္းပါ။
1983 ခုႏွစ္မွာ Lotus Development Corp. မွ Lotus 1-2-3 Software ကုိ ထုတ္လုပ္ခဲ့ၿပီး အဲဒီမွာ စာစီ software အျဖစ္ Lotus Word Pro ပါလာခဲ့ပါတယ္။ Satellite Software International (SSI) မွ Word Perfect ကုိ ထုတ္လုပ္ခဲ့ပါတယ္။ ၎ company ဟာ ေနာက္ေတာ့ WordPerfect Corporation လုိ႔ အမည္ေျပာင္းခဲ့ၿပီး 1996 ခုႏွစ္မွာ Corel Corporation က လဲႊေျပာင္းယူလုိက္ပါတယ္။ Corel Word Perfect Suite ဆုိၿပီး ထုတ္လုပ္ခဲ့ပါတယ္။
1984 ခုႏွစ္မွာ Office Solutions Inc. မွ Office Writer စာစီ Software နဲ႔ Samna Corp., မွ Samna Word III စာစီ software တုိ႔ကို ထုတ္လုပ္ခဲ့ပါတယ္။ Microsoft ရဲ႕ Microsoft Word စာစီ Software ကလည္း သူ႔ရဲ႕ Windows စနစ္နဲ႔အတူ နာမည္ရေနပါၿပီ။ Easy Writer, Super Writer, Perfect Writer, Display Writer, VisiWord Plus ကဲ့သုိ႔ေသာ အျခားေသာ စာစီ Software မ်ားလည္း အမ်ားအျပား ရွိေန ပါၿပီ။
အဲဒီလုိ စာစီ Software ေတြ အၿပိဳင္ေပၚထြက္ေနတဲ့ၾကားက Aldus Company ကုိ အထိနာခဲ့ေစတာဟာ Quark XPress စာစီ Software ျဖစ္ခဲ့ပါတယ္။ ၎ကို Quark Inc. က 1988 ခုႏွစ္မွာ ထုတ္လုပ္ခဲ့ၿပီး အျခားေသာ စာစီ Software မ်ားကိုလည္း ယွဥ္ၿပိဳင္ႏုိင္ခဲ့ပါတယ္။ Aldus ရဲ႕ PageMaker ဟာ Software ေစ်းကြက္မွာ Quark XPress ကုိ မယွဥ္ႏုိင္ခဲ့တဲ့အေျခအေနသုိ႔ ေရာက္လာခဲ့ပါတယ္။ Aldus အတြက္ ၀င္ေငြလည္း ေလ်ာ့နည္းလာခဲ့ပါတယ္။ သုိ႔ျဖစ္၍ 1994 ခုႏွစ္၊ September လမွာ Adobe Company က PageMaker ကုိ လဲႊေျပာင္းယူလုိက္ပါတယ္။ Aldus ကုိ တည္ေထာင္ခဲ့သူ Paul Brainerd လည္း မူလက သူရည္မွန္းထားခဲ့တဲ့ Brainerd Foundation (http://www.brainerd.org) ကုိ ဖဲြ႕စည္းတည္ေထာင္ခဲ့ၿပီး Software လုပ္ငန္းကို ေက်ာခုိင္းခဲ့ပါတယ္။
Adobe က PageMaker Software ကုိ ဆက္လက္ကုိင္တြယ္ခဲ့ရာမွာ 1995 ခုႏွစ္မွာ Adobe PageMaker 6.0 နဲ႔ 1996 ခုႏွစ္မွာ PageMaker 6.5/ 6.5 Plus ဟူ၍ ေပၚထြက္ခဲ့ပါတယ္။ ထုိ႔အတူ Chinese PageMaker 5.0 လည္း ေပၚထြက္လာခဲ့ပါတယ္။ 1999 ခုႏွစ္မွာ PageMaker 7.0 ကို ထုတ္ လုပ္ခဲ့ၿပီး လက္ရွိအားျဖင့္ ၎သည္ ေနာက္ဆုံး Version ျဖစ္ပါတယ္။
Adobe ရဲ႕ လက္ထက္မွာ PageMaker Software ဟာ နာမည္ထင္ရွား အသုံးမ်ားခဲ့ေပမယ့္ Adobe အေနနဲ႔ သူ႔ရဲ႕ Adobe InDesign ေလာက္ စိတ္၀င္စားမႈ မရွိခဲ့ပါ။ Adobe မွာ Desktop Publishing နဲ႔ စပ္လ်ဥ္းတဲ့ Software ေတြလည္း အမ်ားႀကီး ရွိပါတယ္။ PageMaker Software ဟာ Adobe ရဲ႕ မူရင္း Software မဟုတ္ပါဘူး။ PageMaker ဟာ အတုိင္းအတာတစ္ခုမွ နာမည္ရေနလုိ႔သာ ဆက္လက္ အသက္ဆက္ေပးေနတာပါ။ တကယ္တမ္းမွာ PageMaker ကုိ Desktop Publishing လုပ္ငန္းမွာ အဓိက မက်ေတာ့ဘူးလုိ႔ သတ္မွတ္ထားပါတယ္။ အိမ္သုံးနဲ႔ လုပ္ငန္းအေသးစားေလးမ်ားမွာသာ အသုံး၀င္တယ္လုိ႔ ဆုိတယ္။ ေနာက္ၿပီး Adobe မွာ Desktop Publishing အတြက္ Adobe InDesign ဆုိတာ ရွိၿပီးသားပါ။ ၎ Software ကုိ PageMaker အစား ေျပာင္းလဲပဲြထုတ္ဖုိ႔ ရည္ရြယ္ထားတယ္ ဆုိပါတယ္။ အဲဒီ အခ်က္ ေတြေၾကာင့္ PageMaker ကို အဆင့္ျမႇင့္ရန္ အေၾကာင္း မျမင္ေတာ့ပါ။
Adobe ရဲ႕ တည္ေနရာဟာ Adobe System Inc. 345 Park Ave. San Jose, CA 95110-2704 ျဖစ္ ၿပီး ဆက္သြယ္ရန္မွာ (800) 833-6687 http://www.adobe.com, ftp://ftp.adobe.com ျဖစ္ပါတယ္။ Adobe InDesign မွာ ယခုအခါ Version 4.0 သုိ႔ ေရာက္ေနၿပီး Adobe Creative Suite အေနနဲ႔ ပါရွိပါ တယ္။ PageMaker ကုိ စာစီစာ႐ုိက္လုပ္ငန္းမ်ားမွာ ဆက္လက္သုံးေနဦးမွာ ျဖစ္ေပမယ့္ ဒီထက္ ေကာင္း မြန္တဲ့ စြမ္းေဆာင္ႏုိင္ခ်က္ေတြကို ထပ္မံၿပီး ရႏုိင္ေတာ့မည္ မဟုတ္ေပ။ Adobe InDesign အေနနဲ႔သာ ပုိၿပီး အဆင့္ျမႇင့္လာမွာျဖစ္လုိ႔ အဆုိပါ Adobe InDesign Software ကုိ ေလ့လာထားၾကလွ်င္ ပုိမုိၿပီး အက်ဳိးရွိ ပါလိမ့္မည္ ျဖစ္ပါတယ္။

Ref: Computer Journal: August-2005

2008-07-29

Microsoft Office 2003 All-in-one by Joe Habraken


Learn to use the core Office applications, Web integration, and Windows XP quickly, with ten manageable mini-books in one. Each of the ten parts is a hands-on tutorial broken down into short and easy-to-understand lessons, getting the reader up to speed with Office essentials immediately. Ten books in one makes this an affordable and valuable means for learning Office 11 and more!
Provides basic information, plus some intermediate coverage.
Covers the core Office components (Word, Excel, PowerPoint, Access, FrontPage, and Outlook) as well as Windows XP, Web integrations and Internet Explorer.
Joe Habraken is a best selling author whose publications include Complete Idiots Guide to Microsoft Access 2000, and Practical Cisco Routers. He has a Masters degree from the American University in Washington, D.C. and more than 12 years of experience as an educator, author, and consultant in the information technology field. Joe is a Microsoft Certified Professional and Cisco Certified Network Associate. He currently serves as a technical director for ReviewNet Corporation and is also an instructor at the University of New England in Portland, Maine, where he teaches IT Certification courses.

http://rapidshare.com/files/89552745/Microsoft_Office_2003_All-In-One.chm

Source: http://www.whereweget.com/e-books/

Fix your Own PC Magazine (Vol-11, Issue 1)


Computers are wonderful tools that occasionally refuse to work the way they should. When something does go wrong, you can avoid frustrating (and costly) downtime by learning to fix your own PC. Use the basic troubleshooting techniques and step-by step instructions in this issue to solve hundreds of common hardware and software problems.

2008-07-20

How to remove the Thumb.db File From your Hard Drive


ကြန္ပ်ဴတာအတြင္းရွိ Thumb ဖုိင္မ်ားကို ဖယ္ထုတ္ျခင္း

Windows directory အတြင္းရွိ Thumb ဖုိင္မ်ားဟာ Thumbnail Pictures မ်ားကို ဖုံးကြယ္ရန္အတြက္ အသုံး၀င္ပါတယ္။ Thumbnail Picture ေတြကေတာ့ ႐ုပ္ပုံတစ္ခု (သုိ႔) document တစ္ခုကုိ အလ်င္အျမန္ ၾကည့္႐ႈ၍ မရႏုိင္ေအာင္ ေသးငယ္စြာ ပုံေဖာ္ထားျခင္း ျဖစ္ပါတယ္။ Graphic (သုိ႔) D.T.P ဖုိင္မ်ားကို မထုတ္မီ ပါ၀င္ေသာ အခ်က္အလက္မ်ားကို စစ္ေဆးဖုိ႔ လြယ္ကူအဆင္ေျပတဲ့ နည္းလမ္းကုိ ျဖစ္ေစပါတယ္။ ဖုိင္မ်ားနဲ႔ ပုံမ်ားကို Thumbnail View အေနနဲ႔ၾကည့္မယ္ဆုိပါက Thumb ဖုိင္မ်ားဟာ လြန္စြာအဆင္ေျပ လြယ္ကူေစၿပီး ပုိၿပီးလည္း ျမန္ျမန္ဆန္ဆန္ ၾကည့္ႏုိင္ပါတယ္။ Thumb ဖုိင္မ်ားဟာ File Size ေသးငယ္ကာ ေနရာယူမႈ နည္းပါးသည္ဆုိေပမယ့္လည္း ကြန္ပ်ဴတာကုိ ပုံမွန္ဆက္လက္အသုံးျပဳသြားပါက ေသးငယ္တဲ့ ပမာဏကေန ႀကီးမားတဲ့ ပမာဏအထိ ေနရာယူလာပါလိမ့္မယ္။ ဒါေၾကာင့္ Thumbs.db ဖုိင္မ်ား သည္လည္း တကယ္ေတာ့ မလုိအပ္ပါ။ ဖ်က္ပစ္သင့္ပါတယ္။ ဒါေပမယ့္ ပုံေတြကို ၾကည့္တုိင္း ျပန္တုိးလာမွာပါ။ ၎ ဖုိင္ မ်ား မေပၚခ်င္ရင္ေတာ့...

(1) Desktop ေပၚရွိ My Computer ကုိ double click ႏွိပ္ၿပီး Open လုပ္ပါ။
(2) Tools ေအာက္က Folder Option ကုိ Click ႏွိပ္ပါ။
(3) ထုိ႔ေနာက္ View Tab ကုိ Click ႏွိပ္ပါ။
(4) ၿပီးေနာက္ Do not cache thumbnails ေဘးတြင္ရွိေနေသာ အမွန္ျခစ္ကို ေရြးခ်ယ္ထားလုိက္ပါ။
(5) ထုိ႔ေနာက္ OK ကုိ ေရြးခ်ယ္ၿပီး My Computer မွ ျပန္ထြက္လုိက္ပါ။

ထပ္မံၿပီး Thumb ဖုိင္မ်ားကို ရွာေဖြၿပီး ဖ်က္ပစ္ရန္အတြက္..
(1) Start ကုိ Click ႏွိပ္ၿပီး Search ေပၚတြင္ ထပ္မံၿပီး Click တစ္ခ်က္ထပ္မံႏွိပ္ပါ။
(2) File မ်ားကို ရွာေဖြရန္အတြက္ All files and Folders ကုိ ေရြးခ်ယ္ပါ။
(3) ရွာေဖြရန္အတြက္ စာသားအကြက္ထဲတြင္ thumbs.db လုိ႔ ႐ုိက္ထည့္ၿပီး ရွာေဖြႏုိင္ပါသည္။
(4) ထုိ႔အျပင္ Start ကုိ Click ႏွိပ္ၿပီး Run ကုိ ေရြးခ်ယ္ကာ Text box ထဲတြင္ %temp% ဟူ၍ ႐ုိက္ထည့္ၿပီးလည္း ရွာေဖြၾကည့္ႏုိင္ပါတယ္။ ေပၚလာေသာ %temp% မ်ားအားလုံးကုိ ဖ်က္ပစ္လုိက္ ႏုိင္ပါၿပီ။


2008-05-06

၀င္းဒုိး(စ္) တင္နည္း


Windows XP Clean Installation

Computer အသုံးျပဳသူတစ္ဦးအေနနဲ႔ တစ္ေန႔ေန႔၊ တစ္ခ်ိန္ခ်ိန္မွာ မလဲြမေသြႀကဳံေတြ႕ရမွာက Computer ပ်က္စီးမႈပဲ ျဖစ္ပါတယ္။ ကြန္ပ်ဴတာဟာ အသုံးခ်ခံ Electronic Device တစ္ခုသာ ျဖစ္တဲ့အတြက္ သူ႔ရဲ႕ပ်က္စီးမႈဟာ အထူးအေထြ အံ့ၾသစရာ မရွိပါ။ ပ်က္စီးမႈႀကဳံေတြ႕လာရင္ ေက်ာ္လႊားႏုိင္ဖုိ႔ ျပဳျပင္မႈ အတတ္ပညာကုိ မျဖစ္မေန တတ္ေျမာက္ထားဖုိ႔ အေရးႀကီးတဲ့ ေခတ္ကာလကုိ ေရာက္ရွိလာၿပီ ျဖစ္ပါတယ္။
Computer ပ်က္စီးမႈ (၂)မ်ဳိးသာ ရွိပါတယ္..။ ၎တုိ႔မွာ-

(1) Hardware
(2) Software ပ်က္စီးမႈတုိ႔ ျဖစ္ပါတယ္..။

Hardware ပ်က္စီးမႈ

Hardware ပ်က္စီးမႈဟာ အေၾကာင္းမ်ဳိးစုံ ရွိပါတယ္။ Electronic Devices မ်ားသာ ျဖစ္တဲ့အတြက္ မူလစက္႐ုံ မွ ထုတ္လုပ္စဥ္ကတည္းက ပါရွိလာတဲ့ အျပစ္ေၾကာင့္ ပ်က္တာလား၊ အသုံးျပဳတဲ့ သက္တမ္း ၾကာလာလုိ႔ ပ်က္ တာလား၊ အသုံးျပဳတဲ့ လွ်ပ္စစ္ဓာတ္အား မတည္ၿငိမ္မႈေၾကာင့္ ပ်က္တာလား၊ အသုံးျပဳသူရဲ႕ အမွားအယြင္း ေၾကာင့္ ပ်က္စီးတာလား စသည္ျဖင့္ မ်ဳိးစုံျဖစ္ႏုိင္ပါသည္။

Software ပ်က္စီးမႈ

Computer မွာ အသုံးျပဳတဲ့ Software ကို (၂)မ်ဳိး ခြဲျခားႏုိင္ပါသည္။ ၎တုိ႔မွာ-
(1) Operating System
(2) Application Software ဆုိၿပီး (၂)မ်ဳိးရွိပါတယ္..။

ကြန္ပ်ဴတာ စတင္လႈပ္ရွားႏုိင္ဖို႔ Operating System တစ္ခု လိုအပ္ပါတယ္။ အသုံးမ်ားတဲ့ Operating System ေတြကုိ ေအာက္မွာ ေဖာ္ျပလုိက္ပါတယ္..။ ၎တုိ႔မွာ-

(1) DOS 6.22
(2) Windows 3.1
(3) Windows 95
(4) Windows 98
(5) Windows ME
(6) Windows XP
(7) Windows NT
(8) Windows 2000 တုိ႔ ျဖစ္ၾကပါတယ္..။

Windows 3.1 ဟာ Operating System မဟုတ္ပါ။ DOS 6.22 မွာ မွီၿပီး အသုံးျပဳရတဲ့ Application Software တစ္ခုသာ ျဖစ္ပါတယ္။ က်န္ Windows အားလုံးဟာ Operating System ေတြ ျဖစ္ၾကပါတယ္။ Windows NT နဲ႔ Windows 2000 တုိ႔ဟာ Network Version မ်ား ျဖစ္ၾကပါတယ္။

Word, Excel, PageMaker တုိ႔လုိ Software ေတြဟာ Application Software ေတြ ျဖစ္ပါတယ္။ Computer အသုံးျပဳမႈ က်ယ္ျပန္႔လာတာနဲ႔အမွ် Application Software ေတြ ျပႆနာေပၚရင္ အမ်ားအားျဖင့္ အသုံးျပဳသူ Computer ၀ါသနာရွင္မ်ားကုိယ္တုိင္ ေျဖရွင္းႏုိင္ေနၿပီျဖစ္ပါတယ္။ ဒါေပမယ့္ Windows XP မွာ ျပႆနာ ေပၚရင္ Computer အသုံးျပဳသူေတြဟာ ကုိယ္တုိင္ Installation လုပ္ဖုိ႔ မ၀ံ့မရဲ ျဖစ္ေနတတ္ပါတယ္။ ဒါေၾကာင့္ Windows XP ပ်က္တဲ့အခါ အလြယ္ကူဆုံး ထည့္ႏုိင္ဖုိ႔ ႀကိဳတင္ျပင္ဆင္ထားသင့္တဲ့ နည္းလမ္းေတြကုိ ေျပာျပမွာ ျဖစ္ပါတယ္။ အဲ့ဒါကေတာ့ Clean Installation ျဖစ္ပါတယ္။ Hard Disk အသစ္ကို Windows XP Installation လုပ္ျခင္းနဲ႔အတူ Partition ပုိင္းျခင္း၊ Format လုပ္ျခင္းတုိ႔ တစ္ခါတည္း လုပ္ေဆာင္သြားမွာ ျဖစ္ပါတယ္။
Hard Disk အသစ္မဟုတ္ပဲ Hard Disk အေဟာင္းေပၚမွာ Installation လုပ္ရင္ Format လုပ္ၿပီးထည့္မွာ ျဖစ္တဲ့အတြက္ Data ေတြ ပ်က္စီးႏုိင္တာကုိ ႀကိဳတင္သိထားဖုိ႔ လုိပါတယ္။ ဒါ့ေၾကာင့္ Partition ပုိင္းတာက အစ စီမံကိန္းခ်ၿပီး သတိရွိရွိနဲ႔ လုပ္ေဆာင္ရမွာ ျဖစ္ပါတယ္။

Hard Disk ကုိ စတင္အသုံးျပဳႏုိင္ဖုိ႔ Partition အရင္ ပုိင္းရပါမယ္။ Partition ကို FAT32 နဲ႔ ပုိင္းမွာလား၊ NTFS နဲ႔ ပုိင္းမွာလား၊ ႀကိတင္စဥ္းစားရပါတယ္။ Windows OS ဘယ္ႏွစ္မ်ဳိး အသုံးျပဳမွာလဲဆုိတာ ႀကိဳတင္ စဥ္းစားရပါတယ္။ Windows 98 ကုိ အသုံးျပဳမယ္ဆုိရင္ FAT32 ကုိ အသုံးျပဳရပါမယ္။ Windows XP ကုိ FAT32 (သုိ႔) NTFS ႏွစ္မ်ဳိးစလုံးမွာ အသုံးျပဳႏုိင္ပါတယ္။ Windows OS ႏွစ္မ်ဳိးစလုံး အသုံးျပဳမွာဆုိရင္ အနည္း ဆုံး Partition ႏွစ္ခုပုိင္းရင္ အေကာင္းဆုံးျဖစ္ပါတယ္။

အခု ေျပာျပမယ့္ ကြန္ပ်ဴတာရဲ႕ Partition ကို NTFS နဲ႔ ပုိင္းမွာ ျဖစ္တဲ့အတြက္ Windows 98, Windows ME တုိ႔ ထည့္သြင္းလို႔ မရတာကို သတိျပဳရပါမယ္..။

Windows XP တစ္မ်ဳိးတည္းထည့္မွာ ျဖစ္တဲ့အတြက္ Partition တစ္ပုိင္းတည္းထား႐ုံနဲ႔ အဆင္ေျပပါတယ္။ သုိ႔ေသာ္ Windows XP ျပႆနာေပၚခဲ့ရင္ အျမန္ဆုံး၊ အလြယ္ကူဆုံးထည့္တဲ့နည္းလမ္းဟာ Clean Installation ျဖစ္ပါတယ္။ Clean Installation နဲ႔အတူ Format လုပ္ၿပီးထည့္မွာျဖစ္တဲ့အတြက္ Partition တစ္ပုိင္းတည္းထား မွာဆုိရင္ Format လုပ္ၿပီးတဲ့အခါတုိင္းမွာ Data ေတြ ပ်က္သြားမွာ ျဖစ္ပါတယ္။ ဒါေၾကာင့္ PageMaker တုိ႔နဲ႔ ႐ုိက္ထားတဲ့ Documents Files ေတြ၊ အသံပုိင္းဆုိင္ရာ Files ေတြ၊ Video ပုိင္းဆုိင္ရာ Data ေတြကို ဒုတိယ Partition မွာ သိမ္းထားမွာ ျဖစ္ပါတယ္။ Data ေတြကို Partition အလုိက္ ခဲြၿပီးသိမ္းခ်င္ရင္ Partition ကုိ ႏွစ္ခု ထက္ပုိၿပီး ပုိင္းႏုိင္ပါတယ္။

Partition ႏွစ္ပုိင္းပုိင္းမွာျဖစ္တဲ့အတြက္ မိမိ Computer ထဲမွာ Drive Letter "C:" နဲ႔ Drive "D:" တုိ႔ကို ေတြ႕ရ မွာျဖစ္ပါတယ္။ အသစ္ထည့္မယ့္ Windows XP ကုိ Drive "C:" ထဲမွာ ထည့္မွာလား၊ Drive "D:" ထဲမွာ ထည့္ မွာလား၊ ႀကဳိတင္စဥ္းစားထားဖုိ႔ လုိပါတယ္။ Operating System ဟာ Windows XP တစ္မ်ဳိးတည္းသာ အသုံးျပဳ မွာျဖစ္တဲ့အတြက္ Windows XP ကုိ Drive "C:" မွာ ထည့္သြင္းရင္ အေကာင္းဆုံး ျဖစ္ပါတယ္။ Data ေတြ အား လုံးကို Drive "D:" ထဲမွာ သိမ္းထားမွာ ျဖစ္ပါတယ္။

Windows XP Installation (၂) မ်ဳိးရွိပါတယ္။
၎တုိ႔မွာ-
(1) Full Version Installation
(2) Upgrade Installation တုိ႔ ျဖစ္ပါတယ္။ Full Version Installation (၂)မ်ဳိး ရွိပါတယ္။
၎တုိ႔မွာ-
(1) Clean Installation
(2) Command Prompt Installation တုိ႔ ျဖစ္ၾကပါတယ္။ Hard Disk အသစ္ကို Installation လုပ္တဲ့နည္းလမ္း နဲ႔ High Level Format လုပ္ၿပီးမွ ထည့္တဲ့နည္းလမ္းေတြကို Clean Installation လုိ႔ ေခၚပါတယ္။

Installing & Upgrading Windows

Windows ကုိ Install or Upgrade မလုပ္ခင္ လုပ္ရမဲ့အခ်က္ေတြကို အရင္ေလ့လာပါမယ္။

(၁) ပထမဦးဆုံး ကၽြန္ေတာ္တုိ႔ အသုံးျပဳမယ့္ Windows ဟာ ဘယ္လုိ Computer (CPU, RAM, HDD) အနည္း ဆုံးရွိဖုိ႔ လုိအပ္သလဲ။ ဒါကုိ Hardware Requirement လုိ႔ ေခၚပါတယ္။

(၂) ကုိယ္သုံးမယ့္ Windows နဲ႔သုံးထားတဲ့ Hardware ဟာ အပ္စပ္ရဲ႕လား။ ဆီေလွ်ာ္ရဲ႕လား။ ဒါကို Hardware & Software Compatibility လုိ႔ ေခၚပါတယ္။

(၃) အစ, အဆုံး Install ျပန္လုပ္မွာလား။ Clean Install ဒါမွမဟုတ္ ရွိၿပီးသားကုိ Upgrade လုပ္မွာလား။

(၄) Data ကုိ Backup လုပ္ဖုိ႔လုိအပ္ရင္ ဘယ္လုိ Backup လုပ္လုိ႔ ဘယ္လုိျပန္ေခၚၾကမလဲ။ ဒါလည္း စဥ္းစား စီစဥ္ရမယ္။

(၅) Install လုပ္တဲ့အခါ ဘယ္လုိဘယ္ပုံ လုပ္ရမယ္ဆုိတာ ေရြးခ်ယ္ရမယ့္ အဆင့္ဆင့္။

(၆) Hard Disk ကုိ တစ္ပုိင္းတည္းပဲထားမွာလား။ C: ေတြ၊ D: ေတြ ခဲြအုံးမွာလား။ File System က ဘာသုံး မွာလဲ။

(၇) Windows တင္တာေတာ့ ဟုတ္ပါၿပီ။ ဒီ Computer က Network ခ်ိတ္အုံးမွာလား။

(၈) Computer မွာ Windows ကုိ English လား၊ German လား၊ Language ေရြးေပးပါ။ ဒီေရြးေပးတ့ဲေပၚ မူတည္ၿပီး Currency တုိ႔၊ Keyboard Layout တုိ႔ ေျပာင္းသြားမွာ ျဖစ္ပါတယ္။

(၉) Install လုပ္ၿပီးသြားရင္ လုပ္ရမယ့္အခ်က္မ်ားစုေဆာင္းပါ စသည္ျဖင့္ အခ်က္(၉)ခ်က္နဲ႔ လုပ္သြားမွာ ျဖစ္ပါ တယ္။

Entering Setup Program
System BIOS သည္ power on self test (Post) လုပ္ေနစဥ္အတြင္းမွာ CMOS setup program ကုိ access လုပ္ခြင့္ေပးထားပါတယ္။ Computer power စဖြင့္ၿပီး မၾကာခင္ System memory ကုိ စစ္ေဆးေနစဥ္ အတြင္း setup ထဲသုိ႔ ၀င္ေရာက္ရန္အတြက္ key တစ္ခုခုကုိ ႏွိပ္ပါဆုိတဲ့ ၫႊန္ၾကားခ်က္ပါ၀င္ေသာ message ကို screen ေပၚတြင္ ေတြ႕ရပါလိမ့္မယ္။


AMI ၊ Award ႏွင့္ အျခားအသုံးမ်ားေသာ BIOS မ်ားတြင္ Delete Key သည္ Setup အတြင္း ၀င္ေရာက္ရန္ Standard key ျဖစ္ၿပီး အခ်ဳိ႕ေသာ BIOS မ်ားမွာေတာ့ F1 ၊ F2 ၊ F10 ၊ Esc ၊ အစရွိေသာ Key မ်ားကို ႏွိပ္ၿပီး ၀င္ေရာက္ရပါတယ္။ Memory Test လုပ္ေနစဥ္အတြင္း ၫႊန္ၾကားထားတဲ့ Key (ဥပမာ Del ) ကုိ ႏွိပ္မယ္ဆုိရင္ ေရြးခ်ယ္စရာ Menu မ်ားစြာပါရွိေသာ BIOS setup program ရဲ႕ Interface ကုိ ျမင္ရပါမယ္။ ထုိ Interface သည္ BIOS အမ်ဳိးအစားေပၚမူတည္ၿပီး မတူညီပဲ ကဲြျပားၾကပါတယ္။

ဥပမာ-
AMI - F1, Del, Ctrl+S
AST - Ctrl+Alt+Esc
Award - F1, F2, Del, Ctrl+Alt+Enter
Compaq- F10
Phoenix - F2, Ctrl+Alt+Esc, Ctrl+Alt+R, Ctrl+Alt+Ins, Ctrl+Alt+Q, Ctrl+Alt+F1, Ctrl+Alt+(+), Ctrl+Alt+(-)
IBM - PS1 Ctrl+Alt+I အစရွိသည္ျဖင့္ ကဲြျပားႏုိင္ပါတယ္။

Motherboard Manual ထဲတြင္ ထုိ Setup Program ကို ဘယ္လုိအသုံးျပဳရမလဲဆုိတဲ့ ၫႊန္ၾကားခ်က္မ်ား ပါရွိပါတယ္။ Setting တစ္ခုခုကို ေျပာင္းေတာ့မယ္ဆုိရင္ အလြန္သတိထားဖုိ႔ လုိပါတယ္။ အကယ္၍ အေရးႀကီး Setting တစ္ခုခုကို မွားယြင္းေျပာင္းလဲခဲ့မိပါက စက္မတက္သည့္ ျပႆနာမ်ဳိး ႀကဳံေတြ႕ရႏုိင္ပါတယ္။ ဒါေၾကာင့္ setting တစ္ခုခုကို ေျပာင္းေတာ့မယ္ဆုိရင္ မေျပာင္းခင္မွာ နဂုိရွိၿပီးသား CMOS setting မ်ားကို စာရြက္ေပၚမွာ ျဖစ္ျဖစ္ ေရးခ်မွတ္သားထားဖုိ႔ လုိပါလိမ့္မယ္။


System Boot Sequence
ယခုဆက္လက္ၿပီးေတာ့ System BIOS ၏ လုပ္ေဆာင္ပုံမ်ားကို ပုိမုိသေဘာေပါက္ နားလည္ေစရန္အတြက္ computer power စဖြင့္ခ်ိန္မွစ၍ Operating System စတင္သည့္ၾကားကာလအတြင္း BIOS မွ လုပ္ေဆာင္ပုံ အဆင့္ဆင့္တုိ႔ကို အနည္းငယ္ ထပ္မံရွင္းျပလုိပါတယ္။

When Power is applied to the computer
Computer Power ဖြင့္လုိက္တဲ့အခါ Power Supply သည္ မိမိအတြင္းပုိင္းမွာ ပုံမွန္လုပ္ေဆာင္ႏုိင္ျခင္း ရွိ/မရွိ စစ္ေဆးၿပီး ေအာင္ျမင္ပါက Power Good Signal ကုိ ထုတ္ေပးပါလိမ့္မယ္။ Motherboard ေပၚရွိ Processor Timer Chip သည္ ထုိ Power Good Signal ကို ရရွိမွသာလွ်င္ Processor reset လုပ္ထားျခင္းကို ရပ္ဆုိင္း လုိက္ၿပီး စတင္အလုပ္လုပ္ေစပါလိမ့္မယ္။ ပုံမွန္အားျဖင့္ power ဖြင့္ခ်ိန္မွစၿပီး power good စတင္ထုတ္ေပးခ်ိန္ ထိ ၁ စကၠန္႔မွ ၅ စကၠန္႔အတြင္း ၾကာျမင့္ေလ့ရွိပါတယ္။

CMOS Setup
Computer ထဲကို Hard Disk အသစ္ တပ္ဆင္ၿပီးတဲ့အခါ Auto Detect Hard Disk လုပ္ေပးရပါတယ္။ Pentium III, P4 Computer ေတြမွာ Auto Detect Hard Disk အပုိင္းဟာ သီးသန္႔လုပ္ေဆာင္ေပးစရာ မလုိပါ။ CMOS Setup က တပ္ဆင္ထားတဲ့ Hard Disk ကုိ Auto ရွာေဖြၿပီး၊ Cylinder, Head, Sector တန္ဖိုးေတြကို ျဖည့္ေပးပါတယ္။ Model နိမ့္တဲ့ PI, PII Computer ေတြမွာေတာ့ Auto Detect Hard Disk ကုိ မျဖစ္မေန လုပ္ ေပးဖုိ႔ လုိအပ္ပါတယ္။

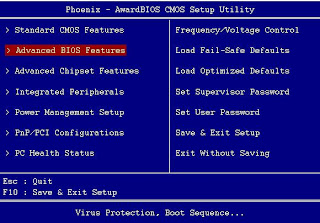
(၁) Computer ဖြင့္စ Post လုပ္ေနတဲ့အခ်ိန္မွာ Del Key ကိုႏွိပ္ၿပီး CMOS setup ထဲကို ၀င္ရပါတယ္။
Press DEL to run Setup ဆုိၿပီး CMOS setup ထဲကို ၀င္ခ်င္ရင္ Del Key ကုိႏွိပ္ၿပီး ၀င္ဖုိ႔ ေျပာ ေနတာကို Monitor ရဲ႕ေအာက္မွာ ေတြ႕ႏုိင္ပါတယ္။


(၂) Hard Disk အသစ္တပ္ဆင္တုိင္း Auto Detect Hard Disk လုပ္ရပါမယ္။ ယခု computer ဟာ P4 ျဖစ္တဲ့ အတြက္ Auto Detect ကုိ သီးသန္႔လုပ္ဖုိ႔ မလုိအပ္ပါ။

(၃) Auto Detect လုပ္ၿပီးတဲ့အခါ Advanced BIOS Feature Setup ထဲကုိ ၀င္လုိက္ရပါတယ္။


BIOS အတြက္ အေရးႀကီးေသာသီးျခား ေရြးခ်ယ္မႈ Navigation Options မ်ားမွာ-
- အေပၚ၊ ေအာက္ Highlight Scroll ေရြးခ်ယ္မႈ ျပဳလုပ္ရန္အတြက္ UP and Down Arrow Key မ်ားကုိ ႏွိပ္၍ ေရြးခ်ယ္ျခင္း၊ (သုိ႔မဟုတ္) Page Up or Page Down Key ကုိ ႏွိပ္ျခင္း။
- Select လုပ္ထားေသာ Option ကုိ ၀င္ေရာက္ရန္အတြက္ Enter Key ကုိ ႏွိပ္ျခင္းျဖင့္ ေရြးခ်ယ္ျခင္း။
- ျပန္ထြက္ရန္အတြက္ Esc Key ကုိ ႏွိပ္ျခင္းျဖင့္ ေရြးခ်ယ္ျခင္း။
- Save လုပ္ၿပီးျပန္ထြက္ရန္အတြက္ F10 Key ကုိ ေရြးခ်ယ္ျခင္း စသည္ျဖင့္ ၀င္ေရာက္ႏုိင္ပါတယ္။

(၃) Boot Sequence ကုိ ေအာက္ပါအတုိင္း ေတြ႕ရပါတယ္။


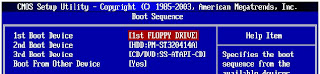
အခ်ဳိ႕ေသာ Boot Sequence မ်ားမွာ HDD-0 ဟာ Hard Disk ကုိ ကုိယ္စားျပဳပါတယ္။ တစ္ခါတရံ IDE-0 လုိ႔လည္း ေဖာ္ျပတတ္ပါတယ္။

(၄) ပုံတြင္ျမင္ရသည့္အတုိင္း 1st Boot Device = 1st FLOPPY DRIVE ေပၚမွာ Highlight ထားၿပီး၊ Floppy မွ CD-ROM ကုိေျပာင္းရန္ Key (or) Key ကုိ ႏွိပ္ရ ပါတယ္။ CD-ROM ႏွင့္ Boot လုပ္၍ Windows တင္ရန္အတြက္ First Boot Device ေနရာတြင္ CD-ROM ျဖစ္ေစရန္ ေျပာင္းထားေပးပါ။ Second Boot မွာ HDD-0 မျဖစ္မေနရွိေနဖုိ႔ လုိအပ္ပါတယ္။ Windows XP ကုိ CD-ROM Drive ထဲထည့္ၿပီး CMOS Setup ထဲ မွာ Boot Sequence မွာ CD-ROM ကုိ First Boot Device အျဖစ္ ထားလုိက္ပါတယ္။

(၅) Boot Sequence ရဲ႕ First Boot မွာ CD-ROM ကုိ ေရြးခ်ယ္ၿပီးတဲ့အခါ Key ကုိႏွိပ္ၿပီး Main Menu ကုိ သြားလုိက္ပါတယ္။ Save လုပ္ရန္အတြက္ Key ကုိ ႏွိပ္လုိက္ပါတယ္။ ထုိအခါ ပုံတြင္ျပထားသည့္အတုိင္း Save to CMOS and EXIT (Y or N) y လုိ႔ေမးတဲ့အခါ "Y" Key ကုိႏွိပ္ၿပီး Enter Key ကုိ ေခါက္လုိက္ပါ။ CMOS Setup မွာ ေျပာင္းလဲထားတဲ့အခ်က္ေတြကို Save လုပ္ၿပီး Reboot ျပန္လုပ္တာ ေတြ႕ရပါတယ္။ CMOS က Save လုပ္ၿပီး ထြက္လုိက္တာ ျဖစ္ပါတယ္။


ထုိအခါ ေအာက္ပါအတိုင္း CD-Drive မွ Boot လုပ္ရန္အတြက္ ႏွစ္သက္ရာ Key တစ္ခုခုကို ႏွိပ္ရန္ ၫႊန္ၾကား ခ်က္တစ္ခု ထပ္မံေပၚလာပါလိမ့္မယ္။ ညႊန္ၾကားခ်က္မွ ေရွ႕ဆက္သြားရန္ "Enter" ေခါက္လုိက္ပါတယ္။


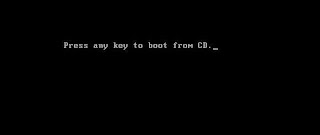
ထုိအခါ ေအာက္ပါအတုိင္း Windows Files မ်ားကို Copy ကူးၿပီးလုိ႔ Restart လုပ္ၿပီးရင္ CD နဲ႔ Boot လုပ္စရာ မလုိပါ။ ဒါေၾကာင့္ "Press any key to boot from CD." ဆုိတဲ့ စာေပၚလာရင္ မည္သည့္ Key မွ ႏွိပ္ေပးရန္ မလုိအပ္ပါ။


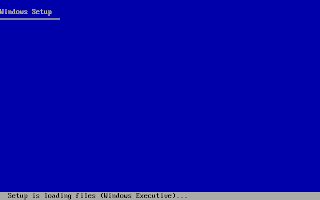
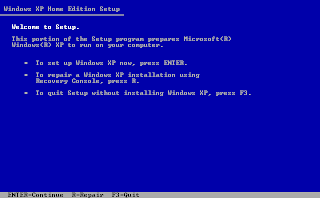
ၿပီးေသာ္ ေအာက္တြင္ျမင္ေတြ႕ရသည့္အတုိင္း Welcome Setup ကုိ ေတြ႕ရပါမယ္။ Enter ေခါက္ရင္ Continue, Repair လုပ္ခ်င္ရင္ R ကုိ ႏွိပ္ပါ၊ ျပန္ထြက္ရန္ F3 ကုိ ႏွိပ္ပါဆုိတဲ့ ၫႊန္ၾကားခ်က္မွ ေရွ႕ဆက္သြားရန္ "Enter" ေခါက္လုိက္ပါတယ္။


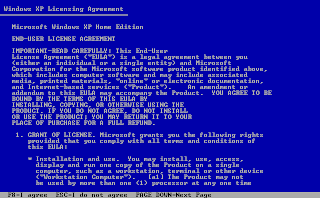
ထိုအခါ ေအာက္ဘက္တြင္ ေတြ႕ရသည့္အတုိင္း License Agreement ေမးေနတဲ့အတြက္ သေဘာတူညီ ေၾကာင္း "F8" Key ကုိ ႏွိပ္လုိက္ပါတယ္။

ဆက္လက္ၿပီး ၫႊန္ၾကားခ်က္မ်ားအတုိင္း ေရွ႕ဆက္သြားရန္ "Enter" Key ကုိ ေခါက္လုိက္ပါ။


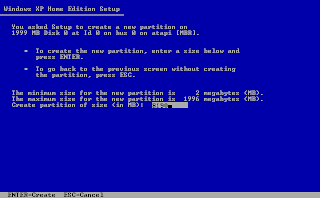
ထုိအခါ Windows XP ထည့္သြင္းရန္ Drive ေရြးခုိင္းျခင္း ျဖစ္ပါတယ္။ ပုံတြင္ ျပထားသည့္အတုိင္း Unpartitioned Space 16379 MB လုိ႔ ျပေနတာကုိ ေတြ႕ရပါတယ္။ Partition ပုိင္းတဲ့အခါ Create နဲ႔ Delete ဆုိတဲ့ Menu ႏွစ္ခု ကုိ အသုံးျပဳရမွာ ျဖစ္ပါတယ္။ Create ဟာ Partition ပုိင္းလုိတဲ့အခါ အသုံးျပဳၿပီး၊ Delete ဟာ Partition ဖ်က္လုိတဲ့အခါ အသုံးျပဳပါတယ္။ Partition မပုိင္းရေသးရင္ Create Menu ကုိသာ ေတြ႕ရမွာျဖစ္ၿပီး Partition ပုိင္းၿပီးတဲ့အခါ Delete Menu ပါ ေပၚလာတာကုိ ေတြ႕ရမွာ ျဖစ္ပါတယ္။ Data ရွိတဲ့ Hard Disk ဆုိရင္ Partition ကုိ Delete လုပ္ၿပီး ဖ်က္လုိက္တာနဲ႔ Hard Disk အတြင္းမွာရွိတဲ့ Software နဲ႔ Data ေတြအားလုံး ပ်က္စီးသြားမွာ ျဖစ္ပါတယ္။

Partition မပုိင္းပဲ တစ္ခုတည္း ထား၍ Install တင္ခ်င္ရင္ "Enter" Key ကုိ ႏွိပ္ပါ။ Maximum Size အတုိင္း Partition ခဲြေပးမွာ ျဖစ္ပါတယ္။ Hard Disk ကုိ Partition ဖန္တီးလုိပါက "C" Key ကုိ ႏွိပ္ပါ။ သုိ႔မဟုတ္ ျပန္ထြက္လုိပါက "F3" Key ကုိ ႏွိပ္ပါဆုိတဲ့ ၫႊန္ၾကားခ်က္တစ္ခု ထပ္မံေပၚလာပါမယ္။ Partition ကုိ C: ႏွင့္ D: ဆုိၿပီး အညီအမွ် (၂)ပုိင္း ပုိင္းထားကာ C: ထဲတြင္ Windows ႏွင့္ အျခား Softwares မ်ားတင္ရန္ႏွင့္ D: ထဲတြင္ Data Backup မ်ားျပဳလုပ္ႏုိင္ဖုိ႔အတြက္ Create လုပ္ရန္ "C" Key ကုိ ႏွိပ္လုိက္ ပါတယ္။


ၿပီးေနာက္ ႏွစ္ပုိင္းထားလုိတဲ့အတြက္ ေပၚေနတဲ့ 16379 MB ကုိ Back Space ႏွိပ္ၿပီး ဖ်က္လုိက္ပါတယ္။ မိမိ ခဲြလုိ တဲ့ Partition Size ကုိ ႐ုိက္ထည့္လုိက္ပါတယ္။ ဥပမာ- အညီအမွ် ထားလုိပါက 8190 လုိ႔ ႐ုိက္ထည့္ေပးျခင္းမ်ဳိး ျဖစ္ပါတယ္။ ၿပီးေသာ္ "Enter" Key ကုိ ေခါက္လုိက္ပါ။


ဒုတိယ Partition ပုိင္းရန္ Unpartitioned Space ကုိ ေရြးခ်ယ္ၿပီး Create လုပ္ရန္ "C" Key ကုိ ႏွိပ္လုိက္ပါ။ ၿပီးေနာက္ "Enter" Key ကုိ ႏွိပ္လုိက္ပါတယ္။ Partition ႏွစ္ပုိင္းပုိင္းထားၿပီးေနာက္ Windows XP ကုိ Drive C: နဲ႔ Drive D: အနက္ ႏွစ္သက္ရာတစ္ခုခုမွာ ထည့္ႏုိင္ပါတယ္။ Windows XP ကုိ Install လုပ္ရန္ Drive C: ကုိ ေရြးခ်ယ္ၿပီး "Enter" Key ကုိ ေခါက္လုိက္ပါတယ္။

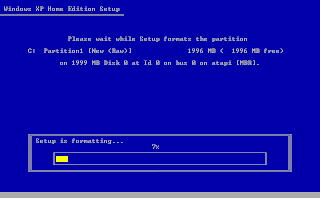
ထုိအခါ ေအာက္တြင္ျပထားသည့္ အတုိင္း Format Partition အပုိင္းကို ေတြ႕ရမွာ ျဖစ္ပါတယ္။ Partition ခဲြ ၿပီးတဲ့အတြက္ Format လုပ္မွာျဖစ္ပါတယ္။ Format ေရြးခ်ယ္စရာ (၄)မ်ဳိးကို ေတြ႕ႏုိင္ပါတယ္။ NTFS (သုိ႔) FAT နဲ႔ပုိင္းမွာလား၊ Quick Format လုပ္မွာလားဆုိတဲ့ ေမးခြန္းေတြကုိ ေတြ႕ရပါတယ္။


FAT
Hard Drive က 2GB ထက္ ငယ္မယ္ဆုိရင္ေတာ့ FAT နဲ႔ Format ခ်ခဲ့မယ္။ 2GB ထက္ႀကီးေနမယ္ ဆုိရင္ ေတာ့ FAT32 ေပါ့။ ဒီေန႔ေခတ္မွာေတာ့ FAT (FAT16) က မသုံးသေလာက္ ျဖစ္သြားပါၿပီ။ ဒါေၾကာင့္ FAT32 ကုိပဲ အမ်ားဆုံး ေတြ႕ရမွာျဖစ္ပါတယ္။ Partition ႏွစ္ပုိင္းပုိင္းထားၿပီး တစ္ပုိင္းကို FAT32 ထားမယ္၊ ေနာက္ တစ္ပုိင္းကို NTFS ထားမယ္ဆုိရင္ေတာ့ FAT32 ကေန NTFS ကုိ ေတြ႕ရမွာ မဟုတ္ပါ။ သုံးလုိ႔ရမွာ မဟုတ္ပါ။

NTFS
Windows 2000 ရဲ႕ NTFS က (NTFS 5) ပါ။ Windows 4.0 ရဲ႕ (NTFS 4) ထက္ ေကာင္းမြန္တဲ့အခ်က္ (သုိ႔) NTFS 4 က မလုပ္ႏုိင္ေသာ အခ်က္အနည္းငယ္ ရွိပါတယ္။ အဲဒါေတြကေတာ့ အသုံးျပဳသူေတြကို Hard Disk Space ကုိ သူ႔ကိုသုံးသေလာက္ပဲ ခဲြေ၀ေပးလုိ႔ရပါတယ္။ Hard Drive ထဲမွာ File and Folder ေတြကို Security အတြက္ Encrypt လုပ္ႏုိင္ပါတယ္။ Windows 2000 ရဲ႕ Dynamic Disk Configuration ကုိ Support လုပ္ပါ တယ္။ သင့္ရဲ႕ Computer မွာ Windows System တစ္မ်ဳိးတည္းသာ သုံးမယ္ဆုိရင္ NTFS ကုိ သုံးတာ အေကာင္းဆုံးပါပဲ။ Local File Security လည္း ရမယ္ေလ။

Quick Format ဟာ Format တစ္ႀကိမ္လုပ္ၿပီးတဲ့ Partition ေတြအတြက္ ျဖစ္ပါတယ္။ ဒါေၾကာင့္ "Format the partition using the NTFS file system" ကို ေရြးခ်ယ္လုိက္ပါတယ္။

ေအာက္ဘက္ပုံတြင္ ျမင္ေတြ႕ရသည့္အတုိင္း Format လုပ္ေနသည္ကို ေတြ႕ရပါမယ္။ Windows XP ဟာ Drive C: ကိုသာ Format လုပ္ေပးမွာျဖစ္ၿပီး က်န္တဲ့ Drive D: ကုိေတာ့ Windows XP တင္ၿပီးတဲ့ေနာက္မွသာ ကုိယ္တုိင္ ျပန္လည္ၿပီး Format လုပ္ရမွာ ျဖစ္ပါတယ္။


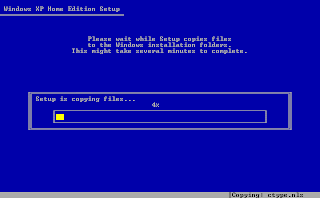
Format လုပ္ၿပီးတဲ့အခါမွာ Windows XP Files ေတြကို CD-ROM ထဲမွ Hard Disk ထဲကုိ Copy ကူးေနတာ ေတြ႕ရပါတယ္။


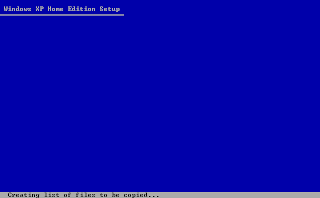
Copy ကူးယူေနမႈ လုပ္ငန္းစဥ္အား အခ်ိန္အနည္းငယ္ ေစာင့္လုိက္ပါ။


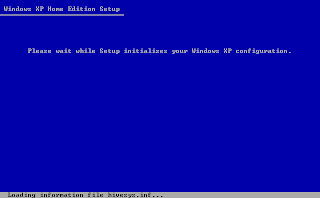
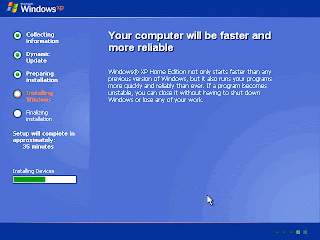
ထုိအခါတြင္ ေအာက္ဘက္တြင္ ျပထားသည့္အတုိင္း Windows အတြက္ လုိအပ္ေသာ Configuration မ်ားကို စတင္ေဆာင္ရြက္ေနပါၿပီ။


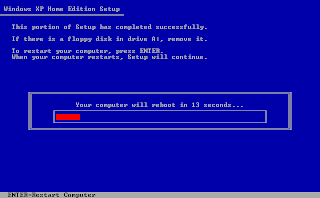
လုိအပ္တဲ့ Files ေတြကုိ Copy ကူးၿပီးတဲ့အခါမွာေတာ့ ေအာက္ပါအတုိင္း Restart ျပန္လုပ္ေနတာကုိ ေတြ႕ရမွာ ပါ။ ေစာင့္ဆုိင္းရန္ စိတ္မရွည္သူမ်ားအတြက္ကေတာ့ "Enter" Key ကုိ သာႏွိပ္လုိက္ၿပီး Restart ျပန္လုပ္ လုိက္ပါ။


Computer ကုိ Restart ျပန္လုပ္ၿပီးတဲ့အခါ "Press any key to boot from CD....." လုိ႔ ျပေနတာကို ေတြ႕ရမွာ ျဖစ္ပါတယ္။ CD-ROM နဲ႔ Boot လုပ္စရာမလုိတဲ့အတြက္ မည္သည့္ Key မွ ထပ္မံၿပီးႏွိပ္စရာ မလုိတာကိုေတာ့ အထူးသတိျပဳဖုိ႔ လုိပါတယ္။

ပုံတြင္ ျပထားသည့္အတုိင္း Windows XP Logo တက္လာပါတယ္။


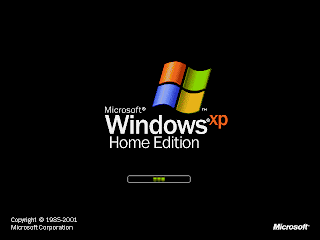
ထုိအခါ ေအာက္ဘက္တြင္ ျမင္ေတြ႕ရသည့္အတုိင္း Windows XP ဟာ 39 Minutes ၾကာရင္ ၿပီးဆုံးမွာ ျဖစ္ပါ တယ္။


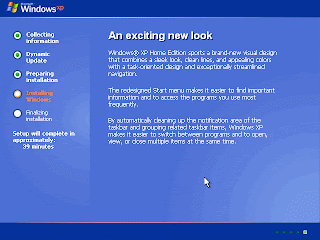
ေအာက္ဘက္တြင္ ျမင္ေတြ႕ေနရသည့္ ပုံမွာ Windows XP Setup မွ လုိအပ္တဲ့ Files မ်ားကို Copy ကူးယူေနပုံ ျဖစ္ပါတယ္။


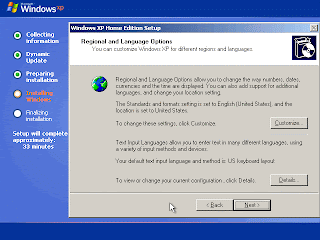
ေအာက္ပါျမင္ေတြ႕ရသည့္ ပုံအတုိင္း Regional and Language Options ေပၚလာၿပီး၊ Default အတုိင္း ယူမွာ ျဖစ္လုိ႔ Next ေပၚမွာ Click ေခါက္လုိက္ပါ။


ေအာက္ပါပုံအတုိင္း Installation လုပ္သူရဲ႕ Name နဲ႔ Organization ကုိ ေတာင္းတဲ့အတြက္ Name နဲ႔ Organization မွာ ႏွစ္သက္ရာ အမည္နဲ႔ ကုမၸဏီ တစ္ခုခုကို ျဖည့္ေပးလုိက္ပါ။

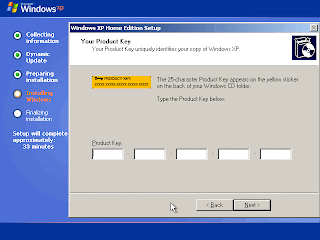
ဆက္လက္ၿပီး ပုံပါအတုိင္း Windows XP ရဲ႕ Product Key ကုိ ထည့္ေပးရန္ လိုအပ္ပါတယ္။ ၿပီးေနာက္ Next ကုိ Click ႏွိပ္လိုက္ပါတယ္။


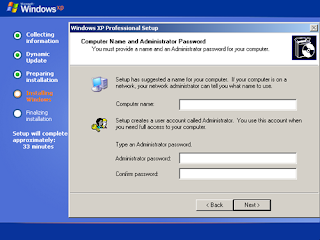
ထုိအခါ ေအာက္ဘက္တြင္ ျမင္ရသည့္အတုိင္း Computer Name ေတာင္းတဲ့အခါ သင္ႏွစ္သက္ရာ အမည္ တစ္ခုခုကို ႐ုိက္ထည့္ေပးပါ။ ထုိ႔ေနာက္တဖန္ Passward ထည့္ထားလုိပါက Administrator Passward နဲ႔ Confirm Passward ရွိ အကြက္ထဲမွာ သင့္စိတ္ႀကိဳက္ Passward တစ္ခုခုကို တူညီမႈရွိေအာင္ ထည့္သြင္း ေပးရပါမယ္။

သင့္ Computer ရဲ႕ Security အတြက္ လုံၿခဳံမႈရွိေအာင္ Passward ကုိ ဒီအတုိင္း blank မထားလုိက္ပါနဲ႔။ Passward ေကာင္းေကာင္းေလးတစ္ခုေလာက္ေတာ့ ထည့္သြင္းေပးထား ေစလုိပါတယ္။ ဥပမာ- ခုိင္မာတဲ့ passward ေတြမွာေတာ့ Letters မ်ား၊ Numbers နဲ႔ Symbols မ်ား ပါ၀င္ၿပီး Dictionary စာအုပ္ထဲမွာ မရွိတဲ့ စကားလုံးေတြ ျဖစ္ရပါမယ္။ ဥပမာ- ေအာက္ေဖာ္ျပပါ Passward မ်ားကုိ ေလ့လာၾကည့္ပါ။
  • dR9f?a9e
  • b7$Pruc?
  • tExjf$n4
  • 2!hATrat
  • s@A3ifus


ဆက္လက္ၿပီး ေအာက္ပါပုံအတုိင္း Date and Time Settings ကုိ ေမးပါတယ္။ Next ေပၚမွာ Click ေခါက္လုိက္ ပါ။


ထုိအခါ Network Settings ေတြကို ေမးလာတဲ့အခါ Typical Settings ကုိ ေရြးခ်ယ္ၿပီး၊ Next ေပၚမွာ Click ေခါက္လုိက္ပါတယ္။


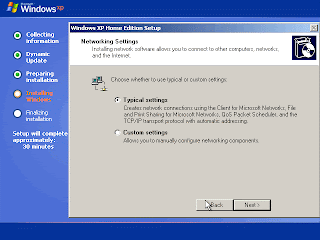
အကယ္၍ Workgroup ႏွင့္ Domain Setting မ်ားအတြက္ ထပ္မံေပၚလာပါက သူ႔နဂုိပါ Default Settings အတုိင္းပင္ ထားလုိက္ပါ။ ထုိ႔ေနာက္ Next ကုိ ထပ္မံ၍ Click ေခါက္လုိက္ပါတယ္။ Network ခ်ိတ္ဆက္ရန္ အတြက္ computer တစ္လုံးနဲ႔တစ္လုံး Workgroup Name တူညီဖုိ႔လိုအပ္ပါတယ္။ Computer Name ကေတာ့ စက္တစ္လုံးကို တစ္မ်ဳိးျဖစ္ပါတယ္။


Finalizing Installation လုပ္ၿပီးတဲ့အခါမွာ computer ကုိ ဒုတိယအႀကိမ္ Restart ျပန္လုပ္ပါတယ္။ "Press any key to boot from CD....." လုိ႔ ေပၚလာရင္ မည္သည့္ Key ကုိမွ် မႏွိပ္ရပါ။ (Windows XP CD နဲ႔ Boot မလုပ္ရပါ။)

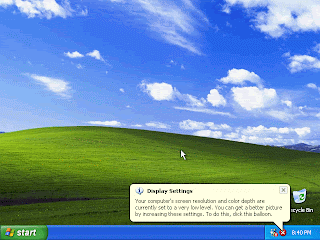
ထုိအခါတြင္ ေအာက္ဘက္ပုံပါအတုိင္း Computer ရဲ႕ Screen Resolution ကုိ ေျပာင္းလဲရန္ Windows XP က ရွာေဖြပါလိမ့္မယ္။ ထုိ႔ေၾကာင့္ Windows XP က အႀကံေပးထားသည့္အတုိင္း Screen Resolution ကုိ အနည္း ဆုံး 800x600 Setting အေနအထားမွာသာ ထားရွိေပးပါေစ။
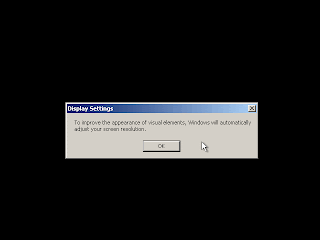

ထုိ႔ေနာက္ OK ကုိ Click ထပ္မံႏွိပ္လုိက္ၿပီး ဆက္သြားလုိက္ပါတယ္။


Windows XP Logo တက္လာၿပီး ေအာက္ဘက္ပုံတြင္ ျမင္ေတြ႕ရသည့္အတုိင္း Welcome Screen ေပၚလာ တဲ့အခါ Next ေပၚမွာ Click ေခါက္လုိက္ပါတယ္။


ၿပီးေနာက္ Internet Connection ေတြကို ေမးတဲ့အခါ Skip ေပၚမွာ Click ေခါက္ၿပီး ေက်ာ္လုိက္ပါတယ္။


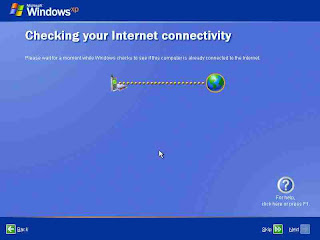
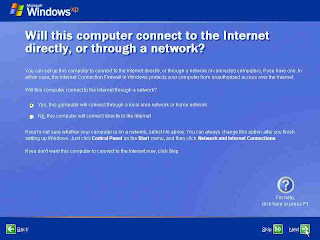
ထပ္မံၿပီး Computer မွ Internet (သုိ႔) Network ဆီသုိ႔ တုိက္႐ုိက္ခ်ိတ္ဆက္မႈ ျပဳလုပ္ရန္ ၫႊန္ၾကားခ်က္တစ္ခု ေပၚလာပါမည္။ Skip ကုိ ေရြးခ်ယ္ၿပီး Click ေခါက္လုိက္ပါတယ္။


ထုိ႔ေနာက္ ေအာက္ပါအတုိင္း Register လုပ္ခုိင္းတဲ့အခါ "No not at this time" ကို Select လုပ္ၿပီး Next ေပၚမွာ Click ေခါက္လုိက္ပါတယ္။


Login (၀င္ခြင့္ျပဳပါ)
Windows ဘယ္ Version မဆုိ computer တစ္လုံးထဲမွာ User အမ်ားႀကီးကို တစ္ေယာက္ခ်င္းစီ ကုိယ့္စိတ္ ႀကိဳက္ Setting နဲ႔ ၀င္ေရာက္လုိ႔ရပါတယ္။ ဒီလုိျဖစ္ေစဖုိ႔အတြက္ Windows တက္လာတာနဲ႔ Windows ထဲကုိ ၀င္ဖုိ႔ရာ ဦးစြာ Login လုပ္ရပါတယ္။ သုိ႔ေသာ္လည္း တစ္ခ်ဳိ႕က ကုိယ့္ရဲ႕စက္ကို ကုိယ္ပဲသုံးမယ္။ Login Box လည္း မထားဘူး။ Passward လည္း မထားဘူးဆုိရင္ေတာ့ Login လုပ္စရာမလုိပဲ Desktop တန္းေပၚလာမွာ ျဖစ္ပါတယ္။

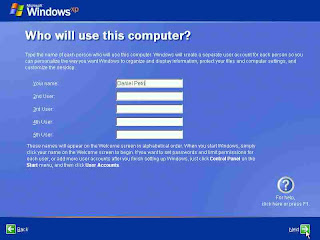
ဆက္လက္ၿပီး ပုံပါအတုိင္း Windows XP က သင့္ Computer ကုိ Default User Name အေနနဲ႔ ၀င္ေရာက္ရန္ အတြက္ နာမည္႐ုိက္ထည့္ရန္ ၫႊန္ၾကားပါလိမ့္မယ္။ သင့္အေနျဖင့္ User Names (၅) ေယာက္စာ သတ္မွတ္ ေပးထားႏုိင္ေသာ္လည္း Installation ၿပီးဆုံး သြားတဲ့အခါမွာလည္း ထပ္မံ၍ သတ္မွတ္ေပးႏုိင္ပါေသးတယ္။ ထုိ႔ေၾကာင့္ Your name အကြက္ထဲမွာ သင္ႏွစ္သက္ရာ အမည္တစ္ခုခုကို ႐ုိက္ထည့္ေပးၿပီး Next ကုိ Click ထပ္မံ၍ ႏွိပ္ေပးလုိက္ပါတယ္။


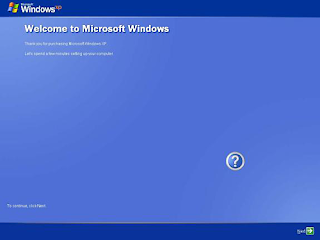
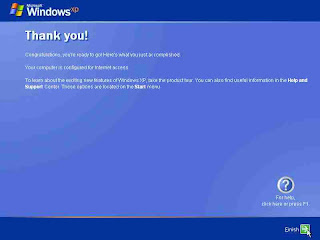
ထုိအခါ ေအာက္ဘက္ပုံပါအတုိင္း Thank you ေပၚလာတဲ့အခါ Windows XP Installation လုပ္ငန္းစဥ္ႀကီး ၿပီးဆုံးသြားပါၿပီ။ Finish မွာ Click ေခါက္လုိက္ပါတယ္။


Welcome Screen ႏွင့္အတူ Windows XP စတက္လာပါၿပီ။

ယခုဆုိရင္ Windows XP ရဲ႕ Desktop ထဲကို ေရာက္ရွိသြားပါၿပီ။ Desktop ဆိုတာ Windows တက္လာရင္ ပထမဆုံး အသုံးျပဳသူထိေတြ႕ရမယ့္ Interface ပဲျဖစ္ပါတယ္။ Desktop ဟာ ေအာက္ဆုံးအလႊာပါပဲ။ ဘာေတြပဲ ေပၚေပၚ သူ႔အေပၚမွာပဲ ေပၚမွာျဖစ္ပါတယ္။ ဒီေလာက္ဆုိရင္ Windows XP Installation ကုိ အလြယ္တကူနဲ႔ ျပဳလုပ္ႏုိင္မယ္လုိ႔ ယုံၾကည္ပါတယ္။


Ref:
ဦးေအးကုိကို (FEB Computer Centre)
(လက္ေတြ႕အသုံးခ် ကြန္ပ်ဴတာျပဳျပင္ျခင္းအေျခခံနည္းစနစ္ႏွင့္ တကယ့္လက္ေတြ႕ျပဳျပင္ျခင္း မွတ္တမ္းမ်ား- တတိယတဲြ)

Zaw Lin (Youth)
(A+ Certification Exam ကြန္ပ်ဴတာအေၾကာင္း အေသးစိတ္သိစရာ)

မ်ဳိးသူရ
( ကြန္ပ်ဴတာတပ္ဆင္ျပဳျပင္ထိန္းသိန္းျခင္း အေျခခံ သေဘာတရားမ်ား)


Up