
Windows XP Clean Installation
Computer အသုံးျပဳသူတစ္ဦးအေနနဲ႔ တစ္ေန႔ေန႔၊ တစ္ခ်ိန္ခ်ိန္မွာ မလဲြမေသြႀကဳံေတြ႕ရမွာက Computer ပ်က္စီးမႈပဲ ျဖစ္ပါတယ္။ ကြန္ပ်ဴတာဟာ အသုံးခ်ခံ Electronic Device တစ္ခုသာ ျဖစ္တဲ့အတြက္ သူ႔ရဲ႕ပ်က္စီးမႈဟာ အထူးအေထြ အံ့ၾသစရာ မရွိပါ။ ပ်က္စီးမႈႀကဳံေတြ႕လာရင္ ေက်ာ္လႊားႏုိင္ဖုိ႔ ျပဳျပင္မႈ အတတ္ပညာကုိ မျဖစ္မေန တတ္ေျမာက္ထားဖုိ႔ အေရးႀကီးတဲ့ ေခတ္ကာလကုိ ေရာက္ရွိလာၿပီ ျဖစ္ပါတယ္။
Computer ပ်က္စီးမႈ (၂)မ်ဳိးသာ ရွိပါတယ္..။ ၎တုိ႔မွာ-
(1) Hardware
(2) Software ပ်က္စီးမႈတုိ႔ ျဖစ္ပါတယ္..။
Hardware ပ်က္စီးမႈ
Hardware ပ်က္စီးမႈဟာ အေၾကာင္းမ်ဳိးစုံ ရွိပါတယ္။ Electronic Devices မ်ားသာ ျဖစ္တဲ့အတြက္ မူလစက္႐ုံ မွ ထုတ္လုပ္စဥ္ကတည္းက ပါရွိလာတဲ့ အျပစ္ေၾကာင့္ ပ်က္တာလား၊ အသုံးျပဳတဲ့ သက္တမ္း ၾကာလာလုိ႔ ပ်က္ တာလား၊ အသုံးျပဳတဲ့ လွ်ပ္စစ္ဓာတ္အား မတည္ၿငိမ္မႈေၾကာင့္ ပ်က္တာလား၊ အသုံးျပဳသူရဲ႕ အမွားအယြင္း ေၾကာင့္ ပ်က္စီးတာလား စသည္ျဖင့္ မ်ဳိးစုံျဖစ္ႏုိင္ပါသည္။
Software ပ်က္စီးမႈ
Computer မွာ အသုံးျပဳတဲ့ Software ကို (၂)မ်ဳိး ခြဲျခားႏုိင္ပါသည္။ ၎တုိ႔မွာ-
(1) Operating System
(2) Application Software ဆုိၿပီး (၂)မ်ဳိးရွိပါတယ္..။
ကြန္ပ်ဴတာ စတင္လႈပ္ရွားႏုိင္ဖို႔ Operating System တစ္ခု လိုအပ္ပါတယ္။ အသုံးမ်ားတဲ့ Operating System ေတြကုိ ေအာက္မွာ ေဖာ္ျပလုိက္ပါတယ္..။ ၎တုိ႔မွာ-
(1) DOS 6.22
(2) Windows 3.1
(3) Windows 95
(4) Windows 98
(5) Windows ME
(6) Windows XP
(7) Windows NT
(8) Windows 2000 တုိ႔ ျဖစ္ၾကပါတယ္..။
Windows 3.1 ဟာ Operating System မဟုတ္ပါ။ DOS 6.22 မွာ မွီၿပီး အသုံးျပဳရတဲ့ Application Software တစ္ခုသာ ျဖစ္ပါတယ္။ က်န္ Windows အားလုံးဟာ Operating System ေတြ ျဖစ္ၾကပါတယ္။ Windows NT နဲ႔ Windows 2000 တုိ႔ဟာ Network Version မ်ား ျဖစ္ၾကပါတယ္။
Word, Excel, PageMaker တုိ႔လုိ Software ေတြဟာ Application Software ေတြ ျဖစ္ပါတယ္။ Computer အသုံးျပဳမႈ က်ယ္ျပန္႔လာတာနဲ႔အမွ် Application Software ေတြ ျပႆနာေပၚရင္ အမ်ားအားျဖင့္ အသုံးျပဳသူ Computer ၀ါသနာရွင္မ်ားကုိယ္တုိင္ ေျဖရွင္းႏုိင္ေနၿပီျဖစ္ပါတယ္။ ဒါေပမယ့္ Windows XP မွာ ျပႆနာ ေပၚရင္ Computer အသုံးျပဳသူေတြဟာ ကုိယ္တုိင္ Installation လုပ္ဖုိ႔ မ၀ံ့မရဲ ျဖစ္ေနတတ္ပါတယ္။ ဒါေၾကာင့္ Windows XP ပ်က္တဲ့အခါ အလြယ္ကူဆုံး ထည့္ႏုိင္ဖုိ႔ ႀကိဳတင္ျပင္ဆင္ထားသင့္တဲ့ နည္းလမ္းေတြကုိ ေျပာျပမွာ ျဖစ္ပါတယ္။ အဲ့ဒါကေတာ့ Clean Installation ျဖစ္ပါတယ္။ Hard Disk အသစ္ကို Windows XP Installation လုပ္ျခင္းနဲ႔အတူ Partition ပုိင္းျခင္း၊ Format လုပ္ျခင္းတုိ႔ တစ္ခါတည္း လုပ္ေဆာင္သြားမွာ ျဖစ္ပါတယ္။
Hard Disk အသစ္မဟုတ္ပဲ Hard Disk အေဟာင္းေပၚမွာ Installation လုပ္ရင္ Format လုပ္ၿပီးထည့္မွာ ျဖစ္တဲ့အတြက္ Data ေတြ ပ်က္စီးႏုိင္တာကုိ ႀကိဳတင္သိထားဖုိ႔ လုိပါတယ္။ ဒါ့ေၾကာင့္ Partition ပုိင္းတာက အစ စီမံကိန္းခ်ၿပီး သတိရွိရွိနဲ႔ လုပ္ေဆာင္ရမွာ ျဖစ္ပါတယ္။
Hard Disk ကုိ စတင္အသုံးျပဳႏုိင္ဖုိ႔ Partition အရင္ ပုိင္းရပါမယ္။ Partition ကို FAT32 နဲ႔ ပုိင္းမွာလား၊ NTFS နဲ႔ ပုိင္းမွာလား၊ ႀကိတင္စဥ္းစားရပါတယ္။ Windows OS ဘယ္ႏွစ္မ်ဳိး အသုံးျပဳမွာလဲဆုိတာ ႀကိဳတင္ စဥ္းစားရပါတယ္။ Windows 98 ကုိ အသုံးျပဳမယ္ဆုိရင္ FAT32 ကုိ အသုံးျပဳရပါမယ္။ Windows XP ကုိ FAT32 (သုိ႔) NTFS ႏွစ္မ်ဳိးစလုံးမွာ အသုံးျပဳႏုိင္ပါတယ္။ Windows OS ႏွစ္မ်ဳိးစလုံး အသုံးျပဳမွာဆုိရင္ အနည္း ဆုံး Partition ႏွစ္ခုပုိင္းရင္ အေကာင္းဆုံးျဖစ္ပါတယ္။
အခု ေျပာျပမယ့္ ကြန္ပ်ဴတာရဲ႕ Partition ကို NTFS နဲ႔ ပုိင္းမွာ ျဖစ္တဲ့အတြက္ Windows 98, Windows ME တုိ႔ ထည့္သြင္းလို႔ မရတာကို သတိျပဳရပါမယ္..။
Windows XP တစ္မ်ဳိးတည္းထည့္မွာ ျဖစ္တဲ့အတြက္ Partition တစ္ပုိင္းတည္းထား႐ုံနဲ႔ အဆင္ေျပပါတယ္။ သုိ႔ေသာ္ Windows XP ျပႆနာေပၚခဲ့ရင္ အျမန္ဆုံး၊ အလြယ္ကူဆုံးထည့္တဲ့နည္းလမ္းဟာ Clean Installation ျဖစ္ပါတယ္။ Clean Installation နဲ႔အတူ Format လုပ္ၿပီးထည့္မွာျဖစ္တဲ့အတြက္ Partition တစ္ပုိင္းတည္းထား မွာဆုိရင္ Format လုပ္ၿပီးတဲ့အခါတုိင္းမွာ Data ေတြ ပ်က္သြားမွာ ျဖစ္ပါတယ္။ ဒါေၾကာင့္ PageMaker တုိ႔နဲ႔ ႐ုိက္ထားတဲ့ Documents Files ေတြ၊ အသံပုိင္းဆုိင္ရာ Files ေတြ၊ Video ပုိင္းဆုိင္ရာ Data ေတြကို ဒုတိယ Partition မွာ သိမ္းထားမွာ ျဖစ္ပါတယ္။ Data ေတြကို Partition အလုိက္ ခဲြၿပီးသိမ္းခ်င္ရင္ Partition ကုိ ႏွစ္ခု ထက္ပုိၿပီး ပုိင္းႏုိင္ပါတယ္။
Partition ႏွစ္ပုိင္းပုိင္းမွာျဖစ္တဲ့အတြက္ မိမိ Computer ထဲမွာ Drive Letter "C:" နဲ႔ Drive "D:" တုိ႔ကို ေတြ႕ရ မွာျဖစ္ပါတယ္။ အသစ္ထည့္မယ့္ Windows XP ကုိ Drive "C:" ထဲမွာ ထည့္မွာလား၊ Drive "D:" ထဲမွာ ထည့္ မွာလား၊ ႀကဳိတင္စဥ္းစားထားဖုိ႔ လုိပါတယ္။ Operating System ဟာ Windows XP တစ္မ်ဳိးတည္းသာ အသုံးျပဳ မွာျဖစ္တဲ့အတြက္ Windows XP ကုိ Drive "C:" မွာ ထည့္သြင္းရင္ အေကာင္းဆုံး ျဖစ္ပါတယ္။ Data ေတြ အား လုံးကို Drive "D:" ထဲမွာ သိမ္းထားမွာ ျဖစ္ပါတယ္။
Windows XP Installation (၂) မ်ဳိးရွိပါတယ္။
၎တုိ႔မွာ-
(1) Full Version Installation
(2) Upgrade Installation တုိ႔ ျဖစ္ပါတယ္။ Full Version Installation (၂)မ်ဳိး ရွိပါတယ္။
၎တုိ႔မွာ-
(1) Clean Installation
(2) Command Prompt Installation တုိ႔ ျဖစ္ၾကပါတယ္။ Hard Disk အသစ္ကို Installation လုပ္တဲ့နည္းလမ္း နဲ႔ High Level Format လုပ္ၿပီးမွ ထည့္တဲ့နည္းလမ္းေတြကို Clean Installation လုိ႔ ေခၚပါတယ္။
Installing & Upgrading Windows
Windows ကုိ Install or Upgrade မလုပ္ခင္ လုပ္ရမဲ့အခ်က္ေတြကို အရင္ေလ့လာပါမယ္။
(၁) ပထမဦးဆုံး ကၽြန္ေတာ္တုိ႔ အသုံးျပဳမယ့္ Windows ဟာ ဘယ္လုိ Computer (CPU, RAM, HDD) အနည္း ဆုံးရွိဖုိ႔ လုိအပ္သလဲ။ ဒါကုိ Hardware Requirement လုိ႔ ေခၚပါတယ္။
(၂) ကုိယ္သုံးမယ့္ Windows နဲ႔သုံးထားတဲ့ Hardware ဟာ အပ္စပ္ရဲ႕လား။ ဆီေလွ်ာ္ရဲ႕လား။ ဒါကို Hardware & Software Compatibility လုိ႔ ေခၚပါတယ္။
(၃) အစ, အဆုံး Install ျပန္လုပ္မွာလား။ Clean Install ဒါမွမဟုတ္ ရွိၿပီးသားကုိ Upgrade လုပ္မွာလား။
(၄) Data ကုိ Backup လုပ္ဖုိ႔လုိအပ္ရင္ ဘယ္လုိ Backup လုပ္လုိ႔ ဘယ္လုိျပန္ေခၚၾကမလဲ။ ဒါလည္း စဥ္းစား စီစဥ္ရမယ္။
(၅) Install လုပ္တဲ့အခါ ဘယ္လုိဘယ္ပုံ လုပ္ရမယ္ဆုိတာ ေရြးခ်ယ္ရမယ့္ အဆင့္ဆင့္။
(၆) Hard Disk ကုိ တစ္ပုိင္းတည္းပဲထားမွာလား။ C: ေတြ၊ D: ေတြ ခဲြအုံးမွာလား။ File System က ဘာသုံး မွာလဲ။
(၇) Windows တင္တာေတာ့ ဟုတ္ပါၿပီ။ ဒီ Computer က Network ခ်ိတ္အုံးမွာလား။
(၈) Computer မွာ Windows ကုိ English လား၊ German လား၊ Language ေရြးေပးပါ။ ဒီေရြးေပးတ့ဲေပၚ မူတည္ၿပီး Currency တုိ႔၊ Keyboard Layout တုိ႔ ေျပာင္းသြားမွာ ျဖစ္ပါတယ္။
(၉) Install လုပ္ၿပီးသြားရင္ လုပ္ရမယ့္အခ်က္မ်ားစုေဆာင္းပါ စသည္ျဖင့္ အခ်က္(၉)ခ်က္နဲ႔ လုပ္သြားမွာ ျဖစ္ပါ တယ္။
Entering Setup Program
System BIOS သည္ power on self test (Post) လုပ္ေနစဥ္အတြင္းမွာ CMOS setup program ကုိ access လုပ္ခြင့္ေပးထားပါတယ္။ Computer power စဖြင့္ၿပီး မၾကာခင္ System memory ကုိ စစ္ေဆးေနစဥ္ အတြင္း setup ထဲသုိ႔ ၀င္ေရာက္ရန္အတြက္ key တစ္ခုခုကုိ ႏွိပ္ပါဆုိတဲ့ ၫႊန္ၾကားခ်က္ပါ၀င္ေသာ message ကို screen ေပၚတြင္ ေတြ႕ရပါလိမ့္မယ္။

AMI ၊ Award ႏွင့္ အျခားအသုံးမ်ားေသာ BIOS မ်ားတြင္ Delete Key သည္ Setup အတြင္း ၀င္ေရာက္ရန္ Standard key ျဖစ္ၿပီး အခ်ဳိ႕ေသာ BIOS မ်ားမွာေတာ့ F1 ၊ F2 ၊ F10 ၊ Esc ၊ အစရွိေသာ Key မ်ားကို ႏွိပ္ၿပီး ၀င္ေရာက္ရပါတယ္။ Memory Test လုပ္ေနစဥ္အတြင္း ၫႊန္ၾကားထားတဲ့ Key (ဥပမာ Del ) ကုိ ႏွိပ္မယ္ဆုိရင္ ေရြးခ်ယ္စရာ Menu မ်ားစြာပါရွိေသာ BIOS setup program ရဲ႕ Interface ကုိ ျမင္ရပါမယ္။ ထုိ Interface သည္ BIOS အမ်ဳိးအစားေပၚမူတည္ၿပီး မတူညီပဲ ကဲြျပားၾကပါတယ္။
ဥပမာ-
AMI - F1, Del, Ctrl+S
AST - Ctrl+Alt+Esc
Award - F1, F2, Del, Ctrl+Alt+Enter
Compaq- F10
Phoenix - F2, Ctrl+Alt+Esc, Ctrl+Alt+R, Ctrl+Alt+Ins, Ctrl+Alt+Q, Ctrl+Alt+F1, Ctrl+Alt+(+), Ctrl+Alt+(-)
IBM - PS1 Ctrl+Alt+I အစရွိသည္ျဖင့္ ကဲြျပားႏုိင္ပါတယ္။
Motherboard Manual ထဲတြင္ ထုိ Setup Program ကို ဘယ္လုိအသုံးျပဳရမလဲဆုိတဲ့ ၫႊန္ၾကားခ်က္မ်ား ပါရွိပါတယ္။ Setting တစ္ခုခုကို ေျပာင္းေတာ့မယ္ဆုိရင္ အလြန္သတိထားဖုိ႔ လုိပါတယ္။ အကယ္၍ အေရးႀကီး Setting တစ္ခုခုကို မွားယြင္းေျပာင္းလဲခဲ့မိပါက စက္မတက္သည့္ ျပႆနာမ်ဳိး ႀကဳံေတြ႕ရႏုိင္ပါတယ္။ ဒါေၾကာင့္ setting တစ္ခုခုကို ေျပာင္းေတာ့မယ္ဆုိရင္ မေျပာင္းခင္မွာ နဂုိရွိၿပီးသား CMOS setting မ်ားကို စာရြက္ေပၚမွာ ျဖစ္ျဖစ္ ေရးခ်မွတ္သားထားဖုိ႔ လုိပါလိမ့္မယ္။

System Boot Sequence
ယခုဆက္လက္ၿပီးေတာ့ System BIOS ၏ လုပ္ေဆာင္ပုံမ်ားကို ပုိမုိသေဘာေပါက္ နားလည္ေစရန္အတြက္ computer power စဖြင့္ခ်ိန္မွစ၍ Operating System စတင္သည့္ၾကားကာလအတြင္း BIOS မွ လုပ္ေဆာင္ပုံ အဆင့္ဆင့္တုိ႔ကို အနည္းငယ္ ထပ္မံရွင္းျပလုိပါတယ္။
When Power is applied to the computer
Computer Power ဖြင့္လုိက္တဲ့အခါ Power Supply သည္ မိမိအတြင္းပုိင္းမွာ ပုံမွန္လုပ္ေဆာင္ႏုိင္ျခင္း ရွိ/မရွိ စစ္ေဆးၿပီး ေအာင္ျမင္ပါက Power Good Signal ကုိ ထုတ္ေပးပါလိမ့္မယ္။ Motherboard ေပၚရွိ Processor Timer Chip သည္ ထုိ Power Good Signal ကို ရရွိမွသာလွ်င္ Processor reset လုပ္ထားျခင္းကို ရပ္ဆုိင္း လုိက္ၿပီး စတင္အလုပ္လုပ္ေစပါလိမ့္မယ္။ ပုံမွန္အားျဖင့္ power ဖြင့္ခ်ိန္မွစၿပီး power good စတင္ထုတ္ေပးခ်ိန္ ထိ ၁ စကၠန္႔မွ ၅ စကၠန္႔အတြင္း ၾကာျမင့္ေလ့ရွိပါတယ္။
CMOS Setup
Computer ထဲကို Hard Disk အသစ္ တပ္ဆင္ၿပီးတဲ့အခါ Auto Detect Hard Disk လုပ္ေပးရပါတယ္။ Pentium III, P4 Computer ေတြမွာ Auto Detect Hard Disk အပုိင္းဟာ သီးသန္႔လုပ္ေဆာင္ေပးစရာ မလုိပါ။ CMOS Setup က တပ္ဆင္ထားတဲ့ Hard Disk ကုိ Auto ရွာေဖြၿပီး၊ Cylinder, Head, Sector တန္ဖိုးေတြကို ျဖည့္ေပးပါတယ္။ Model နိမ့္တဲ့ PI, PII Computer ေတြမွာေတာ့ Auto Detect Hard Disk ကုိ မျဖစ္မေန လုပ္ ေပးဖုိ႔ လုိအပ္ပါတယ္။
(၁) Computer ဖြင့္စ Post လုပ္ေနတဲ့အခ်ိန္မွာ Del Key ကိုႏွိပ္ၿပီး CMOS setup ထဲကို ၀င္ရပါတယ္။
Press DEL to run Setup ဆုိၿပီး CMOS setup ထဲကို ၀င္ခ်င္ရင္ Del Key ကုိႏွိပ္ၿပီး ၀င္ဖုိ႔ ေျပာ ေနတာကို Monitor ရဲ႕ေအာက္မွာ ေတြ႕ႏုိင္ပါတယ္။

(၂) Hard Disk အသစ္တပ္ဆင္တုိင္း Auto Detect Hard Disk လုပ္ရပါမယ္။ ယခု computer ဟာ P4 ျဖစ္တဲ့ အတြက္ Auto Detect ကုိ သီးသန္႔လုပ္ဖုိ႔ မလုိအပ္ပါ။
(၃) Auto Detect လုပ္ၿပီးတဲ့အခါ Advanced BIOS Feature Setup ထဲကုိ ၀င္လုိက္ရပါတယ္။
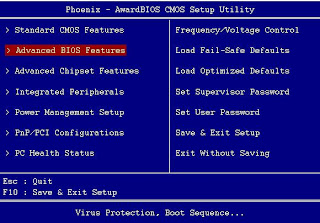
BIOS အတြက္ အေရးႀကီးေသာသီးျခား ေရြးခ်ယ္မႈ Navigation Options မ်ားမွာ-
- အေပၚ၊ ေအာက္ Highlight Scroll ေရြးခ်ယ္မႈ ျပဳလုပ္ရန္အတြက္
- Select လုပ္ထားေသာ Option ကုိ ၀င္ေရာက္ရန္အတြက္
- ျပန္ထြက္ရန္အတြက္
- Save လုပ္ၿပီးျပန္ထြက္ရန္အတြက္
(၃) Boot Sequence ကုိ ေအာက္ပါအတုိင္း ေတြ႕ရပါတယ္။

အခ်ဳိ႕ေသာ Boot Sequence မ်ားမွာ HDD-0 ဟာ Hard Disk ကုိ ကုိယ္စားျပဳပါတယ္။ တစ္ခါတရံ IDE-0 လုိ႔လည္း ေဖာ္ျပတတ္ပါတယ္။
(၄) ပုံတြင္ျမင္ရသည့္အတုိင္း 1st Boot Device = 1st FLOPPY DRIVE ေပၚမွာ Highlight ထားၿပီး၊ Floppy မွ CD-ROM ကုိေျပာင္းရန္
(၅) Boot Sequence ရဲ႕ First Boot မွာ CD-ROM ကုိ ေရြးခ်ယ္ၿပီးတဲ့အခါ

ထုိအခါ ေအာက္ပါအတိုင္း CD-Drive မွ Boot လုပ္ရန္အတြက္ ႏွစ္သက္ရာ Key တစ္ခုခုကို ႏွိပ္ရန္ ၫႊန္ၾကား ခ်က္တစ္ခု ထပ္မံေပၚလာပါလိမ့္မယ္။ ညႊန္ၾကားခ်က္မွ ေရွ႕ဆက္သြားရန္ "Enter" ေခါက္လုိက္ပါတယ္။
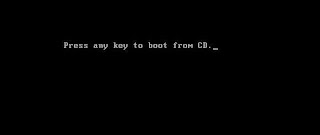
ထုိအခါ ေအာက္ပါအတုိင္း Windows Files မ်ားကို Copy ကူးၿပီးလုိ႔ Restart လုပ္ၿပီးရင္ CD နဲ႔ Boot လုပ္စရာ မလုိပါ။ ဒါေၾကာင့္ "Press any key to boot from CD." ဆုိတဲ့ စာေပၚလာရင္ မည္သည့္ Key မွ ႏွိပ္ေပးရန္ မလုိအပ္ပါ။
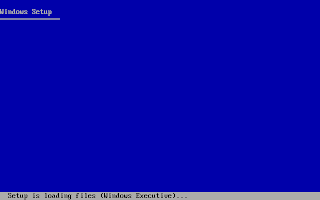
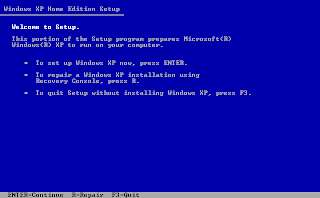
ၿပီးေသာ္ ေအာက္တြင္ျမင္ေတြ႕ရသည့္အတုိင္း Welcome Setup ကုိ ေတြ႕ရပါမယ္။ Enter ေခါက္ရင္ Continue, Repair လုပ္ခ်င္ရင္ R ကုိ ႏွိပ္ပါ၊ ျပန္ထြက္ရန္ F3 ကုိ ႏွိပ္ပါဆုိတဲ့ ၫႊန္ၾကားခ်က္မွ ေရွ႕ဆက္သြားရန္ "Enter" ေခါက္လုိက္ပါတယ္။
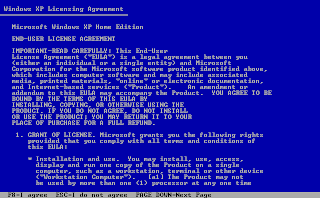
ထိုအခါ ေအာက္ဘက္တြင္ ေတြ႕ရသည့္အတုိင္း License Agreement ေမးေနတဲ့အတြက္ သေဘာတူညီ ေၾကာင္း "F8" Key ကုိ ႏွိပ္လုိက္ပါတယ္။
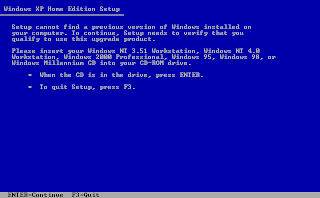
 ဆက္လက္ၿပီး ၫႊန္ၾကားခ်က္မ်ားအတုိင္း ေရွ႕ဆက္သြားရန္ "Enter" Key ကုိ ေခါက္လုိက္ပါ။
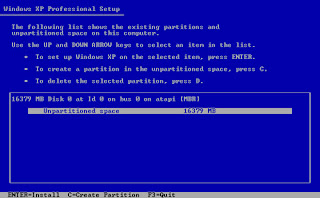
ထုိအခါ Windows XP ထည့္သြင္းရန္ Drive ေရြးခုိင္းျခင္း ျဖစ္ပါတယ္။ ပုံတြင္ ျပထားသည့္အတုိင္း Unpartitioned Space 16379 MB လုိ႔ ျပေနတာကုိ ေတြ႕ရပါတယ္။ Partition ပုိင္းတဲ့အခါ Create နဲ႔ Delete ဆုိတဲ့ Menu ႏွစ္ခု ကုိ အသုံးျပဳရမွာ ျဖစ္ပါတယ္။ Create ဟာ Partition ပုိင္းလုိတဲ့အခါ အသုံးျပဳၿပီး၊ Delete ဟာ Partition ဖ်က္လုိတဲ့အခါ အသုံးျပဳပါတယ္။ Partition မပုိင္းရေသးရင္ Create Menu ကုိသာ ေတြ႕ရမွာျဖစ္ၿပီး Partition ပုိင္းၿပီးတဲ့အခါ Delete Menu ပါ ေပၚလာတာကုိ ေတြ႕ရမွာ ျဖစ္ပါတယ္။ Data ရွိတဲ့ Hard Disk ဆုိရင္ Partition ကုိ Delete လုပ္ၿပီး ဖ်က္လုိက္တာနဲ႔ Hard Disk အတြင္းမွာရွိတဲ့ Software နဲ႔ Data ေတြအားလုံး ပ်က္စီးသြားမွာ ျဖစ္ပါတယ္။
Partition မပုိင္းပဲ တစ္ခုတည္း ထား၍ Install တင္ခ်င္ရင္ "Enter" Key ကုိ ႏွိပ္ပါ။ Maximum Size အတုိင္း Partition ခဲြေပးမွာ ျဖစ္ပါတယ္။ Hard Disk ကုိ Partition ဖန္တီးလုိပါက "C" Key ကုိ ႏွိပ္ပါ။ သုိ႔မဟုတ္ ျပန္ထြက္လုိပါက "F3" Key ကုိ ႏွိပ္ပါဆုိတဲ့ ၫႊန္ၾကားခ်က္တစ္ခု ထပ္မံေပၚလာပါမယ္။ Partition ကုိ C: ႏွင့္ D: ဆုိၿပီး အညီအမွ် (၂)ပုိင္း ပုိင္းထားကာ C: ထဲတြင္ Windows ႏွင့္ အျခား Softwares မ်ားတင္ရန္ႏွင့္ D: ထဲတြင္ Data Backup မ်ားျပဳလုပ္ႏုိင္ဖုိ႔အတြက္ Create လုပ္ရန္ "C" Key ကုိ ႏွိပ္လုိက္ ပါတယ္။
ၿပီးေနာက္ ႏွစ္ပုိင္းထားလုိတဲ့အတြက္ ေပၚေနတဲ့ 16379 MB ကုိ Back Space ႏွိပ္ၿပီး ဖ်က္လုိက္ပါတယ္။ မိမိ ခဲြလုိ တဲ့ Partition Size ကုိ ႐ုိက္ထည့္လုိက္ပါတယ္။ ဥပမာ- အညီအမွ် ထားလုိပါက 8190 လုိ႔ ႐ုိက္ထည့္ေပးျခင္းမ်ဳိး ျဖစ္ပါတယ္။ ၿပီးေသာ္ "Enter" Key ကုိ ေခါက္လုိက္ပါ။
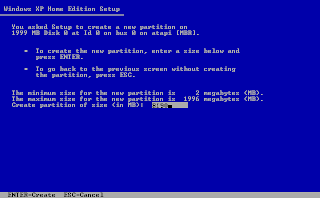
ဒုတိယ Partition ပုိင္းရန္ Unpartitioned Space ကုိ ေရြးခ်ယ္ၿပီး Create လုပ္ရန္ "C" Key ကုိ ႏွိပ္လုိက္ပါ။ ၿပီးေနာက္ "Enter" Key ကုိ ႏွိပ္လုိက္ပါတယ္။ Partition ႏွစ္ပုိင္းပုိင္းထားၿပီးေနာက္ Windows XP ကုိ Drive C: နဲ႔ Drive D: အနက္ ႏွစ္သက္ရာတစ္ခုခုမွာ ထည့္ႏုိင္ပါတယ္။ Windows XP ကုိ Install လုပ္ရန္ Drive C: ကုိ ေရြးခ်ယ္ၿပီး "Enter" Key ကုိ ေခါက္လုိက္ပါတယ္။
ထုိအခါ ေအာက္တြင္ျပထားသည့္ အတုိင္း Format Partition အပုိင္းကို ေတြ႕ရမွာ ျဖစ္ပါတယ္။ Partition ခဲြ ၿပီးတဲ့အတြက္ Format လုပ္မွာျဖစ္ပါတယ္။ Format ေရြးခ်ယ္စရာ (၄)မ်ဳိးကို ေတြ႕ႏုိင္ပါတယ္။ NTFS (သုိ႔) FAT နဲ႔ပုိင္းမွာလား၊ Quick Format လုပ္မွာလားဆုိတဲ့ ေမးခြန္းေတြကုိ ေတြ႕ရပါတယ္။

FAT
Hard Drive က 2GB ထက္ ငယ္မယ္ဆုိရင္ေတာ့ FAT နဲ႔ Format ခ်ခဲ့မယ္။ 2GB ထက္ႀကီးေနမယ္ ဆုိရင္ ေတာ့ FAT32 ေပါ့။ ဒီေန႔ေခတ္မွာေတာ့ FAT (FAT16) က မသုံးသေလာက္ ျဖစ္သြားပါၿပီ။ ဒါေၾကာင့္ FAT32 ကုိပဲ အမ်ားဆုံး ေတြ႕ရမွာျဖစ္ပါတယ္။ Partition ႏွစ္ပုိင္းပုိင္းထားၿပီး တစ္ပုိင္းကို FAT32 ထားမယ္၊ ေနာက္ တစ္ပုိင္းကို NTFS ထားမယ္ဆုိရင္ေတာ့ FAT32 ကေန NTFS ကုိ ေတြ႕ရမွာ မဟုတ္ပါ။ သုံးလုိ႔ရမွာ မဟုတ္ပါ။
NTFS
Windows 2000 ရဲ႕ NTFS က (NTFS 5) ပါ။ Windows 4.0 ရဲ႕ (NTFS 4) ထက္ ေကာင္းမြန္တဲ့အခ်က္ (သုိ႔) NTFS 4 က မလုပ္ႏုိင္ေသာ အခ်က္အနည္းငယ္ ရွိပါတယ္။ အဲဒါေတြကေတာ့ အသုံးျပဳသူေတြကို Hard Disk Space ကုိ သူ႔ကိုသုံးသေလာက္ပဲ ခဲြေ၀ေပးလုိ႔ရပါတယ္။ Hard Drive ထဲမွာ File and Folder ေတြကို Security အတြက္ Encrypt လုပ္ႏုိင္ပါတယ္။ Windows 2000 ရဲ႕ Dynamic Disk Configuration ကုိ Support လုပ္ပါ တယ္။ သင့္ရဲ႕ Computer မွာ Windows System တစ္မ်ဳိးတည္းသာ သုံးမယ္ဆုိရင္ NTFS ကုိ သုံးတာ အေကာင္းဆုံးပါပဲ။ Local File Security လည္း ရမယ္ေလ။
Quick Format ဟာ Format တစ္ႀကိမ္လုပ္ၿပီးတဲ့ Partition ေတြအတြက္ ျဖစ္ပါတယ္။ ဒါေၾကာင့္ "Format the partition using the NTFS file system" ကို ေရြးခ်ယ္လုိက္ပါတယ္။
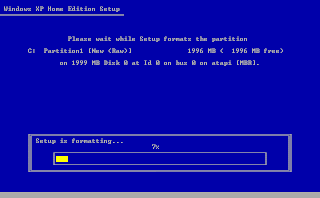
ေအာက္ဘက္ပုံတြင္ ျမင္ေတြ႕ရသည့္အတုိင္း Format လုပ္ေနသည္ကို ေတြ႕ရပါမယ္။ Windows XP ဟာ Drive C: ကိုသာ Format လုပ္ေပးမွာျဖစ္ၿပီး က်န္တဲ့ Drive D: ကုိေတာ့ Windows XP တင္ၿပီးတဲ့ေနာက္မွသာ ကုိယ္တုိင္ ျပန္လည္ၿပီး Format လုပ္ရမွာ ျဖစ္ပါတယ္။
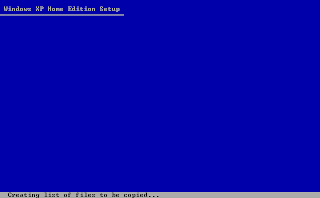
Format လုပ္ၿပီးတဲ့အခါမွာ Windows XP Files ေတြကို CD-ROM ထဲမွ Hard Disk ထဲကုိ Copy ကူးေနတာ ေတြ႕ရပါတယ္။
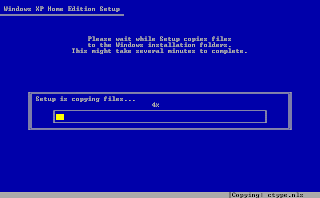
Copy ကူးယူေနမႈ လုပ္ငန္းစဥ္အား အခ်ိန္အနည္းငယ္ ေစာင့္လုိက္ပါ။
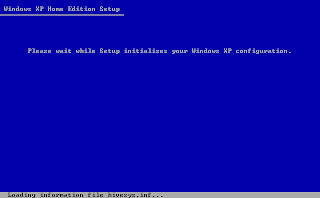
ထုိအခါတြင္ ေအာက္ဘက္တြင္ ျပထားသည့္အတုိင္း Windows အတြက္ လုိအပ္ေသာ Configuration မ်ားကို စတင္ေဆာင္ရြက္ေနပါၿပီ။
လုိအပ္တဲ့ Files ေတြကုိ Copy ကူးၿပီးတဲ့အခါမွာေတာ့ ေအာက္ပါအတုိင္း Restart ျပန္လုပ္ေနတာကုိ ေတြ႕ရမွာ ပါ။ ေစာင့္ဆုိင္းရန္ စိတ္မရွည္သူမ်ားအတြက္ကေတာ့ "Enter" Key ကုိ သာႏွိပ္လုိက္ၿပီး Restart ျပန္လုပ္ လုိက္ပါ။
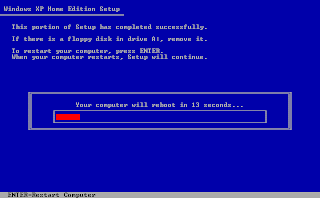
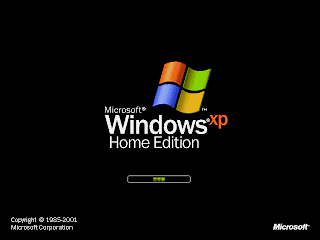
Computer ကုိ Restart ျပန္လုပ္ၿပီးတဲ့အခါ "Press any key to boot from CD....." လုိ႔ ျပေနတာကို ေတြ႕ရမွာ ျဖစ္ပါတယ္။ CD-ROM နဲ႔ Boot လုပ္စရာမလုိတဲ့အတြက္ မည္သည့္ Key မွ ထပ္မံၿပီးႏွိပ္စရာ မလုိတာကိုေတာ့ အထူးသတိျပဳဖုိ႔ လုိပါတယ္။
ပုံတြင္ ျပထားသည့္အတုိင္း Windows XP Logo တက္လာပါတယ္။
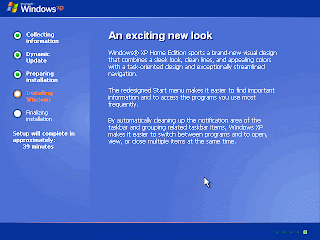
ထုိအခါ ေအာက္ဘက္တြင္ ျမင္ေတြ႕ရသည့္အတုိင္း Windows XP ဟာ 39 Minutes ၾကာရင္ ၿပီးဆုံးမွာ ျဖစ္ပါ တယ္။
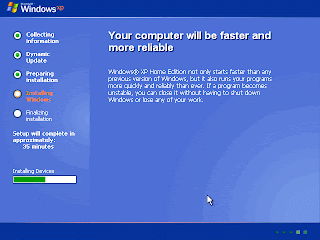
ေအာက္ဘက္တြင္ ျမင္ေတြ႕ေနရသည့္ ပုံမွာ Windows XP Setup မွ လုိအပ္တဲ့ Files မ်ားကို Copy ကူးယူေနပုံ ျဖစ္ပါတယ္။
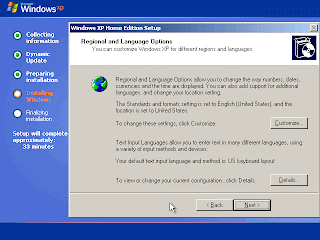
ေအာက္ပါျမင္ေတြ႕ရသည့္ ပုံအတုိင္း Regional and Language Options ေပၚလာၿပီး၊ Default အတုိင္း ယူမွာ ျဖစ္လုိ႔ Next ေပၚမွာ Click ေခါက္လုိက္ပါ။
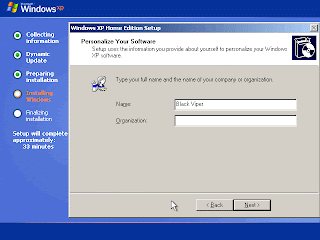
ေအာက္ပါပုံအတုိင္း Installation လုပ္သူရဲ႕ Name နဲ႔ Organization ကုိ ေတာင္းတဲ့အတြက္ Name နဲ႔ Organization မွာ ႏွစ္သက္ရာ အမည္နဲ႔ ကုမၸဏီ တစ္ခုခုကို ျဖည့္ေပးလုိက္ပါ။
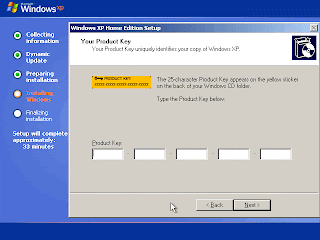
 ဆက္လက္ၿပီး ပုံပါအတုိင္း Windows XP ရဲ႕ Product Key ကုိ ထည့္ေပးရန္ လိုအပ္ပါတယ္။ ၿပီးေနာက္ Next ကုိ Click ႏွိပ္လိုက္ပါတယ္။
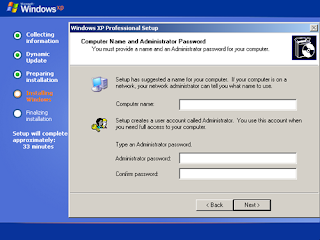
ထုိအခါ ေအာက္ဘက္တြင္ ျမင္ရသည့္အတုိင္း Computer Name ေတာင္းတဲ့အခါ သင္ႏွစ္သက္ရာ အမည္ တစ္ခုခုကို ႐ုိက္ထည့္ေပးပါ။ ထုိ႔ေနာက္တဖန္ Passward ထည့္ထားလုိပါက Administrator Passward နဲ႔ Confirm Passward ရွိ အကြက္ထဲမွာ သင့္စိတ္ႀကိဳက္ Passward တစ္ခုခုကို တူညီမႈရွိေအာင္ ထည့္သြင္း ေပးရပါမယ္။
သင့္ Computer ရဲ႕ Security အတြက္ လုံၿခဳံမႈရွိေအာင္ Passward ကုိ ဒီအတုိင္း blank မထားလုိက္ပါနဲ႔။ Passward ေကာင္းေကာင္းေလးတစ္ခုေလာက္ေတာ့ ထည့္သြင္းေပးထား ေစလုိပါတယ္။ ဥပမာ- ခုိင္မာတဲ့ passward ေတြမွာေတာ့ Letters မ်ား၊ Numbers နဲ႔ Symbols မ်ား ပါ၀င္ၿပီး Dictionary စာအုပ္ထဲမွာ မရွိတဲ့ စကားလုံးေတြ ျဖစ္ရပါမယ္။ ဥပမာ- ေအာက္ေဖာ္ျပပါ Passward မ်ားကုိ ေလ့လာၾကည့္ပါ။
- dR9f?a9e
- b7$Pruc?
- tExjf$n4
- 2!hATrat
- s@A3ifus
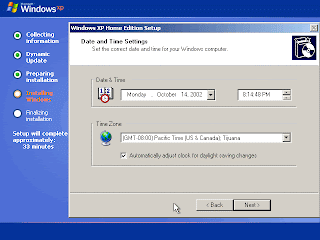
ဆက္လက္ၿပီး ေအာက္ပါပုံအတုိင္း Date and Time Settings ကုိ ေမးပါတယ္။ Next ေပၚမွာ Click ေခါက္လုိက္ ပါ။
ထုိအခါ Network Settings ေတြကို ေမးလာတဲ့အခါ Typical Settings ကုိ ေရြးခ်ယ္ၿပီး၊ Next ေပၚမွာ Click ေခါက္လုိက္ပါတယ္။
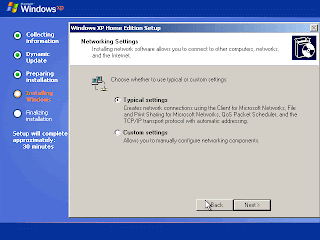
အကယ္၍ Workgroup ႏွင့္ Domain Setting မ်ားအတြက္ ထပ္မံေပၚလာပါက သူ႔နဂုိပါ Default Settings အတုိင္းပင္ ထားလုိက္ပါ။ ထုိ႔ေနာက္ Next ကုိ ထပ္မံ၍ Click ေခါက္လုိက္ပါတယ္။ Network ခ်ိတ္ဆက္ရန္ အတြက္ computer တစ္လုံးနဲ႔တစ္လုံး Workgroup Name တူညီဖုိ႔လိုအပ္ပါတယ္။ Computer Name ကေတာ့ စက္တစ္လုံးကို တစ္မ်ဳိးျဖစ္ပါတယ္။

Finalizing Installation လုပ္ၿပီးတဲ့အခါမွာ computer ကုိ ဒုတိယအႀကိမ္ Restart ျပန္လုပ္ပါတယ္။ "Press any key to boot from CD....." လုိ႔ ေပၚလာရင္ မည္သည့္ Key ကုိမွ် မႏွိပ္ရပါ။ (Windows XP CD နဲ႔ Boot မလုပ္ရပါ။)
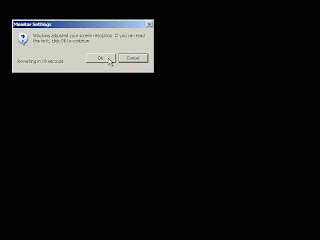
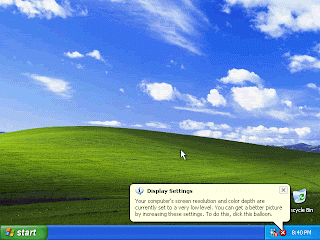
ထုိအခါတြင္ ေအာက္ဘက္ပုံပါအတုိင္း Computer ရဲ႕ Screen Resolution ကုိ ေျပာင္းလဲရန္ Windows XP က ရွာေဖြပါလိမ့္မယ္။ ထုိ႔ေၾကာင့္ Windows XP က အႀကံေပးထားသည့္အတုိင္း Screen Resolution ကုိ အနည္း ဆုံး 800x600 Setting အေနအထားမွာသာ ထားရွိေပးပါေစ။
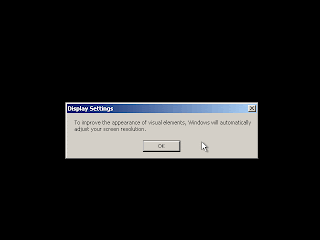
ထုိ႔ေနာက္ OK ကုိ Click ထပ္မံႏွိပ္လုိက္ၿပီး ဆက္သြားလုိက္ပါတယ္။
Windows XP Logo တက္လာၿပီး ေအာက္ဘက္ပုံတြင္ ျမင္ေတြ႕ရသည့္အတုိင္း Welcome Screen ေပၚလာ တဲ့အခါ Next ေပၚမွာ Click ေခါက္လုိက္ပါတယ္။

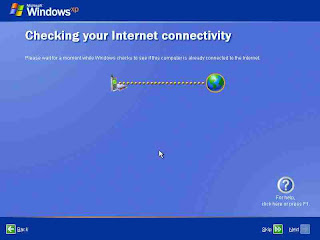
ၿပီးေနာက္ Internet Connection ေတြကို ေမးတဲ့အခါ Skip ေပၚမွာ Click ေခါက္ၿပီး ေက်ာ္လုိက္ပါတယ္။
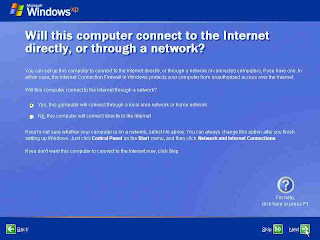
ထပ္မံၿပီး Computer မွ Internet (သုိ႔) Network ဆီသုိ႔ တုိက္႐ုိက္ခ်ိတ္ဆက္မႈ ျပဳလုပ္ရန္ ၫႊန္ၾကားခ်က္တစ္ခု ေပၚလာပါမည္။ Skip ကုိ ေရြးခ်ယ္ၿပီး Click ေခါက္လုိက္ပါတယ္။
ထုိ႔ေနာက္ ေအာက္ပါအတုိင္း Register လုပ္ခုိင္းတဲ့အခါ "No not at this time" ကို Select လုပ္ၿပီး Next ေပၚမွာ Click ေခါက္လုိက္ပါတယ္။

Login (၀င္ခြင့္ျပဳပါ)
Windows ဘယ္ Version မဆုိ computer တစ္လုံးထဲမွာ User အမ်ားႀကီးကို တစ္ေယာက္ခ်င္းစီ ကုိယ့္စိတ္ ႀကိဳက္ Setting နဲ႔ ၀င္ေရာက္လုိ႔ရပါတယ္။ ဒီလုိျဖစ္ေစဖုိ႔အတြက္ Windows တက္လာတာနဲ႔ Windows ထဲကုိ ၀င္ဖုိ႔ရာ ဦးစြာ Login လုပ္ရပါတယ္။ သုိ႔ေသာ္လည္း တစ္ခ်ဳိ႕က ကုိယ့္ရဲ႕စက္ကို ကုိယ္ပဲသုံးမယ္။ Login Box လည္း မထားဘူး။ Passward လည္း မထားဘူးဆုိရင္ေတာ့ Login လုပ္စရာမလုိပဲ Desktop တန္းေပၚလာမွာ ျဖစ္ပါတယ္။
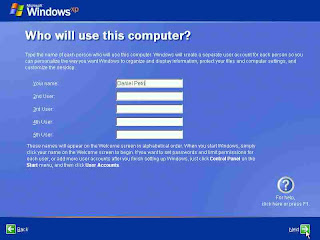
ဆက္လက္ၿပီး ပုံပါအတုိင္း Windows XP က သင့္ Computer ကုိ Default User Name အေနနဲ႔ ၀င္ေရာက္ရန္ အတြက္ နာမည္႐ုိက္ထည့္ရန္ ၫႊန္ၾကားပါလိမ့္မယ္။ သင့္အေနျဖင့္ User Names (၅) ေယာက္စာ သတ္မွတ္ ေပးထားႏုိင္ေသာ္လည္း Installation ၿပီးဆုံး သြားတဲ့အခါမွာလည္း ထပ္မံ၍ သတ္မွတ္ေပးႏုိင္ပါေသးတယ္။ ထုိ႔ေၾကာင့္ Your name အကြက္ထဲမွာ သင္ႏွစ္သက္ရာ အမည္တစ္ခုခုကို ႐ုိက္ထည့္ေပးၿပီး Next ကုိ Click ထပ္မံ၍ ႏွိပ္ေပးလုိက္ပါတယ္။
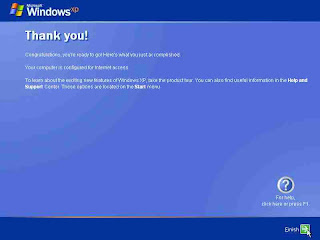
ထုိအခါ ေအာက္ဘက္ပုံပါအတုိင္း Thank you ေပၚလာတဲ့အခါ Windows XP Installation လုပ္ငန္းစဥ္ႀကီး ၿပီးဆုံးသြားပါၿပီ။ Finish မွာ Click ေခါက္လုိက္ပါတယ္။
Welcome Screen ႏွင့္အတူ Windows XP စတက္လာပါၿပီ။
 ယခုဆုိရင္ Windows XP ရဲ႕ Desktop ထဲကို ေရာက္ရွိသြားပါၿပီ။ Desktop ဆိုတာ Windows တက္လာရင္ ပထမဆုံး အသုံးျပဳသူထိေတြ႕ရမယ့္ Interface ပဲျဖစ္ပါတယ္။ Desktop ဟာ ေအာက္ဆုံးအလႊာပါပဲ။ ဘာေတြပဲ ေပၚေပၚ သူ႔အေပၚမွာပဲ ေပၚမွာျဖစ္ပါတယ္။ ဒီေလာက္ဆုိရင္ Windows XP Installation ကုိ အလြယ္တကူနဲ႔ ျပဳလုပ္ႏုိင္မယ္လုိ႔ ယုံၾကည္ပါတယ္။
Ref:
(လက္ေတြ႕အသုံးခ် ကြန္ပ်ဴတာျပဳျပင္ျခင္းအေျခခံနည္းစနစ္ႏွင့္ တကယ့္လက္ေတြ႕ျပဳျပင္ျခင္း မွတ္တမ္းမ်ား- တတိယတဲြ)
(A+ Certification Exam ကြန္ပ်ဴတာအေၾကာင္း အေသးစိတ္သိစရာ)
မ်ဳိးသူရ
( ကြန္ပ်ဴတာတပ္ဆင္ျပဳျပင္ထိန္းသိန္းျခင္း အေျခခံ သေဘာတရားမ်ား)


